
AP Board Replacement Guide For the X2D
Bambu Lab X2D • Série Avançada X2
AP Board Replacement Guide For the X2D
AP board
🔎 Find the X2D AP Board in the Bambu Lab store.
The full name of the AP board is Application Processor Main Board. It is the circuit board responsible for processing information and communication within the printer.
It provides an independent operating environment for the printer and supports all system functions required by printer applications, including memory management, system firmware, graphics processing, and multimedia decoding.
Applicable printer model
Bambu Lab X2D
When to Replace
- The AP board shows obvious physical damage such as connector damage, component detachment, or burn marks;
- Technical analysis from the Bambu Lab support team requires replacing the AP board.
Required tools and materials
- New AP board
- H2.0 allen key
- H1.5 allen key
Aviso de Segurança
IMPORTANT!
It’s crucial to power off the printer before conducting any maintenance work, including work on the printer’s electronics and tool head wires. Performing tasks with the printer on can result in a short circuit, leading to electronic damage and safety hazards.
During maintenance or troubleshooting, you may need to disassemble parts, including the hotend. This exposes wires and electrical components that could short circuit if they contact each other, other metal, or electronic components while the printer is still on. This can result in damage to the printer’s electronics and additional issues.
Therefore, it’s crucial to turn off the printer and disconnect it from the power source before conducting any maintenance. This prevents short circuits or damage to the printer’s electronics, ensuring safe and effective maintenance. For any concerns or questions about following this guide, we recommend submitting a chamado técnico relatando o seu problema. and we will do our best to respond promptly and provide the assistance you need.
⚠️ Important Note:
Once the new serial number (SN) is successfully registered, the old SN will be invalidated, and the old AP board can no longer be registered or bound.
For machines that have had the AP board replaced, as the new SN is not registered, binding cannot be performed. We recommend skipping the binding process during the initial startup to test if the replacement fixed the problem (unless you are troubleshooting network issues). After confirming the machine is working correctly, you can register the new serial number (SN) by logging into the Bambu Lab official website, or contact Bambu Lab Customer Support to register the new SN. For detailed instructions, please refer to: How to Find the Serial Number and Register a New Serial Number

Video Guide
Remove the old AP board
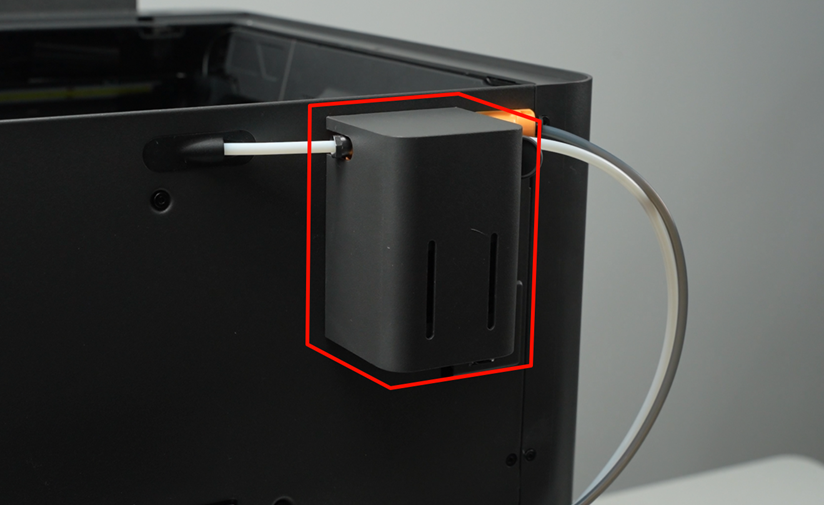
Passo 1. Remove the AP board cover screws
Lift the auxiliary extruder upwards from the back of the printer, unlock the auxiliary extruder locking tab, then remove it to expose the AP board cover fixing screws.
 |
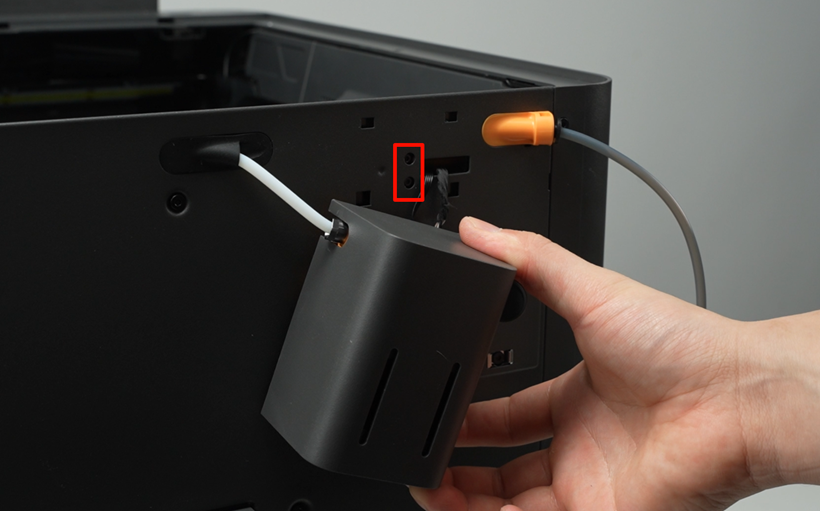 |
Use a H1.5 screwdriver to remove the AP board cover screws.

Passo 2. Remove the AP board cover
Remove the Top Glass Cover.
Manually lift the AP board cover’s maintenance port, from the left side,

Disconnect the left LED light connection,

Remove the entire AP board cover from the frame.
Gently pull it out.

Passo 3. Remove the AP board
Passo 3.1 Disconnect the screen cable
Unlock the locking tab of the screen connector cable first, then disconnect the cable;

Passo 3.2 Disconnect the USB cable
Use a H2.0 allen key to remove one screw on the right side, then disconnect the USB cable,

Passo 3.3 Disconnect the remaining cables
Press down on all locking tabs on the AP board, then disconnect all cables,

Passo 3.4 Remove the AP board
Use a H2.0 allen key to remove the four fixing screws, then take out the AP board.

Passo 3.5 Remove the Wi-Fi Antenna
Use tweezers to remove the silicone from the Wi-Fi Antenna connector, then disconnect it,
 |
 |
Install the new AP board
Passo 1. Install the AP board
Passo 1.1 Connect the Wi-Fi Antenna
First install the Wi-Fi Antenna onto the AP board

Passo 1.2 Intall the AP Board
Insert the bottom of the new AP board at an angle, aligning it with the screw holes on the crossbeam, then push the top of the AP board into the crossbeam as well.

Use a H2.0 allen key to tighten the four fixing screws.
Passo 2. Connect the AP board cables
The AP board cables are described as follows:

| No. | Interface Description | No. | Interface Description | No. | Interface Description | No. | Interface Description |
|---|---|---|---|---|---|---|---|
| 1 | screen connector cable | 4 | Live view camera | 7 | LED light – Left | 10 | Bambu USB-C cable |
| 2 | Wi-Fi Antenna | 5 | USB interface assembly | 8 | MC board (communication) | ||
| 3 | Door Sensor | 6 | LED light – Front | 9 | MC board (power supply) |
Reconnect the cables to the AP board according to the table above.
Passo 2.1 Connect the screen cable
Insert the screen connector cable into the connector, then close the locking tab.
Passo 2.2 Connect the USB cable
Connect the USB cable, use a H2.0 allen key to fasten one screw and secure the USB cable clip
Passo 3. Install the AP board cover
Slide the AP board cover into place along the mounting slot.
(you can use an allen key to ensure the screw holes are aligned)

Passo 3.1 Connect the LED
Connect the left LED, secure the maintenance port,
 |
|
Passo 3.2 Secure the AP Board Cover
Use a H1.5 allen key to tighten the two AP board cover screws on the backplane,
Passo 3.3 Install the auxiliary extruder
Insert the auxiliary extruder in place and secure the locking tab.
Passo 4: Register the SN
For machines that have had the AP board replaced, as the new SN is not registered, binding cannot be performed. We recommend skipping the binding process during the initial startup to test if the replacement fixed the problem (unless you are troubleshooting network issues). After confirming the machine is working correctly, you can register the new serial number (SN) by logging into the Bambu Lab official website, or contact Bambu Lab Customer Support to register the new SN. For detailed instructions, please refer to: How to Find the Serial Number and Register a New Serial Number
Verifying Success
✅ Connect the power, turn on the printer, and check whether printing can be initiated normally.
If you encounter any issues, please retrace your steps and check all connections before trying again.If the problems persist, please contact the Bambu Lab service team for further assistance.
Notas Finais
We hope this guide has provided clear and practical support.
If the issue remains unresolved, please submit a support ticket and include your recent printer logs and additional pictures or other details. Our technical team will review your request and provide detailed assistance.
You can also visit Bambu AI, which can instantly answer common questions and provide you with operational guidance.


