
Front cover Replacement Guide for the X2D
Bambu Lab X2D • Série Avançada X2
Front cover Replacement Guide for the X2D
Front cover
🔎 Find the X2D Front Cover in the Bambu Lab store.
The front cover of the X2D printer is installed on the front of the printer and is a dark gray cover embossed with the X2D model.

Applicable printer model
Bambu Lab X2D
When to Replace
Generally replaced when the front cover is damaged during logistics or transportation.
Required Tools and Materials
- New front cover
- H2.0 allen key
- Flat tweezers
Aviso de Segurança
⚠️ IMPORTANT!
It’s crucial to power off the printer before conducting any maintenance work, including work on the printer’s electronics and tool head wires. Performing tasks with the printer on can result in a short circuit, leading to electronic damage and safety hazards.
During maintenance or troubleshooting, you may need to disassemble parts, including the hotend. This exposes wires and electrical components that could short circuit if they contact each other, other metal, or electronic components while the printer is still on. This can result in damage to the printer’s electronics and additional issues.
Therefore, it’s crucial to turn off the printer and disconnect it from the power source before conducting any maintenance. This prevents short circuits or damage to the printer’s electronics, ensuring safe and effective maintenance. For any concerns or questions about following this guide, we recommend submitting a chamado técnico relatando o seu problema. and we will do our best to respond promptly and provide the assistance you need.
Remove Front Cover
Passo 1. Remove the Screen
Follow the instructions in Touchscreen Replacement Guide for the P2S to remove the screen.

Remove the black fixing tape that secures the screen connector cable.

Retract the screen connector cable from the square hole.

Passo 2. Disconnect WiFi Antenna and LED Light Connections
Open the AP board cover.

Remove the plugs for the front cover: LED light – Front and WiFi antenna from the AP board (use tweezers to clean the silicone around the socket, this helps to disconnect the plugs more easily).

Passo 3. Remove the Front Cover
Remove the two screws securing the front of the front cover, and one screw at the back.

Push up slightly on both sides of the front cover to release the locking tabs, then gently loosen the entire front cover from the frame.

Pull the WiFi antenna cable out through the hole in the frame and remove the front cover.

Passo 4. Remove the LED Strip
Gently peel off the LED strip from the front cover.

Install the Front Cover
Passo 1. Install LED Strip
Attach the LED strip to the front cover.
Align the left side of the LED light with the hot melt post on the sheet metal, then secure the right side of the LED light along the metal strip.

Passo 2. Install the Front Cover
Pass the cables for the LED strip and WiFi antenna through the small hole in the frame.
Install the front cover onto the printer, ensuring the raised parts on both sides fit into the grooves of the left and right side panels.Press down simultaneously on both sides of the front cover to secure the locking tabs in place.

Secure the front cover by installing the two screws at the front and one screw at the back of the cover.
Passo 3. Connect the WiFi Antenna and LED Light – Front
Connect the LED light and WiFi antenna cable connectors to the AP board, close the AP board cover, and secure the cables with the acetate tape on the frame.

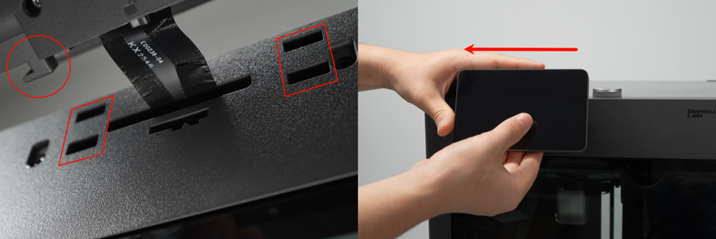
Passo 4. Install the Screen
Pull the screen connector cable through the square hole, and secure it with the black fixing tape.

Follow the guide in Touchscreen Replacement Guide for the P2S to install the screen properly.
Verifying Success
✅ Power on the printer and confirm if the screen displays correctly and the touchscreen functions properly.
✅ Turn the front LED light on and off via the screen to confirm normal operation.
✅ Check the WiFi icon’s signal strength on the screen to ensure normal connectivity.
If the screen or LED light does not function properly, check and reconnect the cables. If the issue persist, please contact the Bambu Lab Service Team for further assistance.
Notas Finais
We hope this guide has provided clear and practical support.
If the issue remains unresolved, please submit a support ticket and include your recent printer logs and additional pictures or other details. Our technical team will review your request and provide detailed assistance.
You can also visit Bambu AI, which can instantly answer common questions and provide you with operational guidance.


