
Complete Extruder Unit Replacement – A1 Series
Bambu Lab A1 • Série Bed-Slinger A1
Complete Extruder Unit Replacement – A1 Series
In this guide, we will show how to replace the Extruder Unit on the A1 mini, but you can use the same article for the A1.

When to use?
This guide is intended for use if there is a problem with the Extruder Unit which cannot be easily repaired.
Common issues that may indicate the need for replacement of the A1 mini Extruder Unit include:
- Problems with the filament cutter lever being damaged, or stripped screws
- Other parts of the extruder have stripped screws that cause problems to the extruder
- The eddy sensor on the extruder is faulty and bed leveling is not working as expected
- The extruder motor is suspected to be faulty and is skipping steps
- Recommended by Bambu Lab Technical Support
Tools and materials needed
Bambu Lab Extruder Unit for A1 series
- H2.0 hex wrench
- H1.5 hex wrench
- 25 minutes of your time
Aviso de Segurança
IMPORTANT!
It’s crucial to power off the printer before conducting any maintenance work, including work on the printer’s electronics and tool head wires. Performing tasks with the printer on can result in a short circuit, leading to electronic damage and safety hazards.
During maintenance or troubleshooting, you may need to disassemble parts, including the hotend. This exposes wires and electrical components that could short circuit if they contact each other, other metal, or electronic components while the printer is still on. This can result in damage to the printer’s electronics and additional issues.
Therefore, it’s crucial to turn off the printer and disconnect it from the power source before conducting any maintenance. This prevents short circuits or damage to the printer’s electronics, ensuring safe and effective maintenance. For any concerns or questions about following this guide, open a new ticket in our Support Page and we will do our best to respond promptly and provide the assistance you need.
Remove the Old Extruder Unit
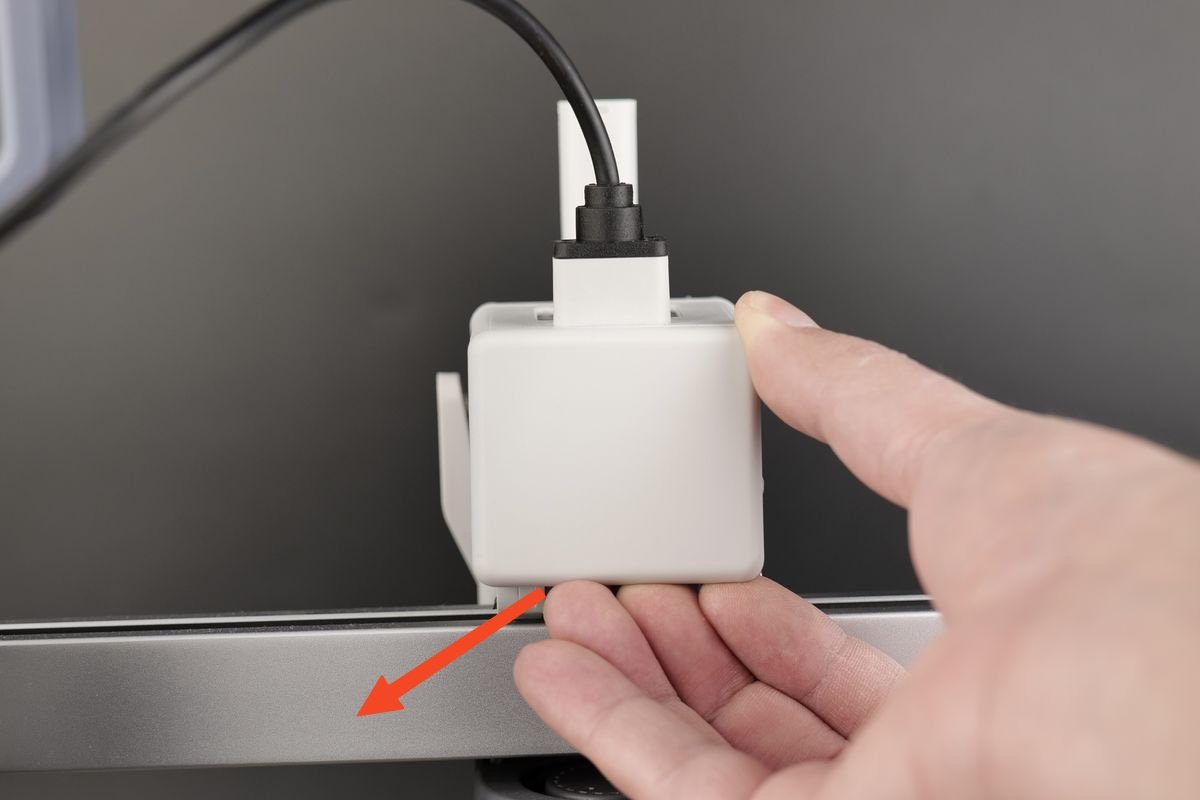
1. Remove the back printhead cover
We start by removing the back cover of the print head.
Carefully pry open the back cover by pulling on the bottom section as shown below.
2. Remove the USB C cable from the print head
Next, remove the four screws holding the USB C cable secure on the tool head of the A1 mini.
After removing the screws, the USB C cable can be pulled upwards to remove it.

3. Remove the Toolhead Board screws
Remove the three black screws holding the Toolhead Board in place.

4. Disconnect the cables
Next, remove the four cables attached to the Toolhead Board.
Carefully pull them out by the connector, and avoid pulling the wires from the connectors.
We recommend using a flat tool to gently pry them out to avoid any potential damage.

Don’t forget to also remove the Eddy sensor wires which are held in place by two screws.

5. Remove the Toolhead board
You can now remove the Tollhead Board from the plastic housing.
Be careful when pulling it out, as you will need to carefully disconnect the filament sensor ribbon cable.
Pull it slowly and straight upwards. Avoid wiggling the ribbon cable as it can cause damage to it. If you have damaged it, you can order a replacement from this link

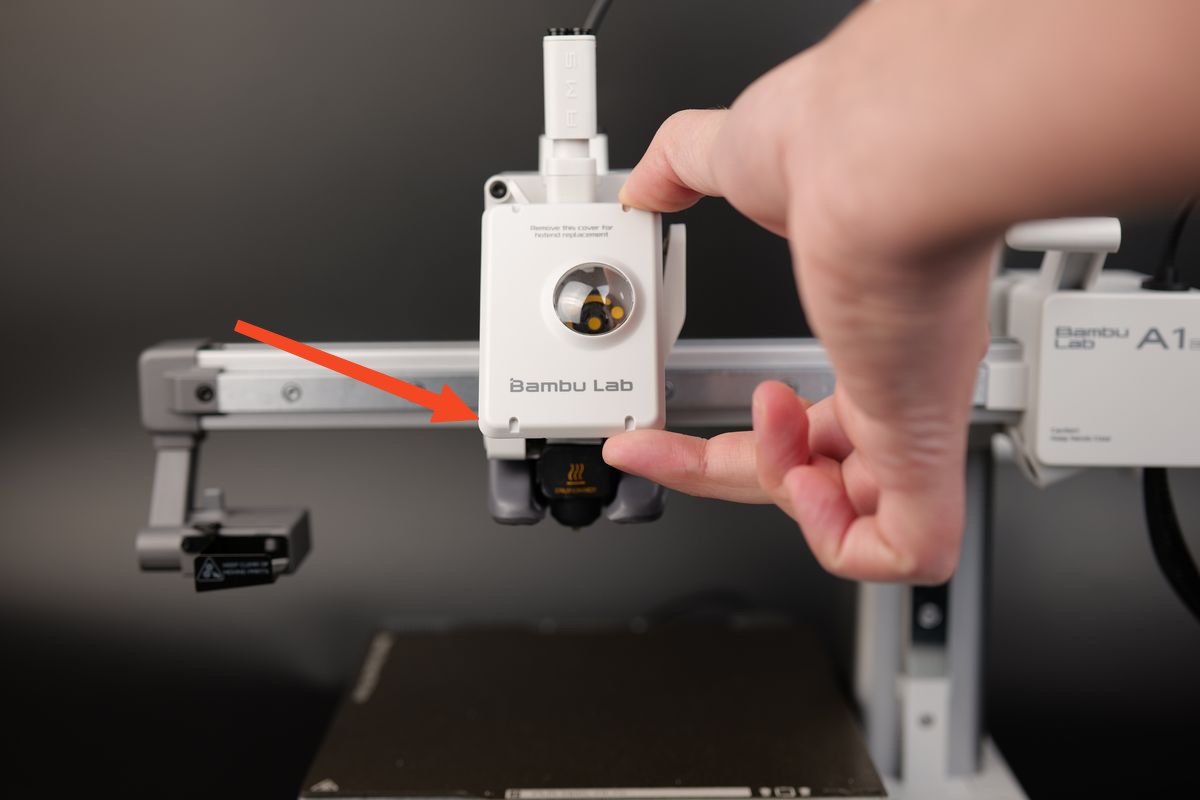
6. Remove the print head front cover
Grab the base of the front cover and gently pull towards you.
The clips holding the cover in place will be released, allowing you to remove the front cover
7. Remove the printer hotend
Remove the nozzle silicone sock by gently pulling it towards you, then remove the hotend from the heater.
All the steps are labeled on the extruder sticker.
This step is required so we can remove the extruder in the next step

8. Remove the Extruder
Remove the four screws indicated in the picture below.
After removing the screws, you will be able to gently pull the extruder towards you slightly.
For the moment, don’t remove the extruder.
CAUTION
There is a sensor wire on the left side of the extruder. Don’t remove the extruder as you can damage it.

9. Remove the left cable channel
The Hotend Cooling Fan wire, including the eddy sensor wire attached to the extruder are routed through the left cable channel
To remove the extruder, you need to gently push the cable channel towards the back of the print head, as shown in the example below.
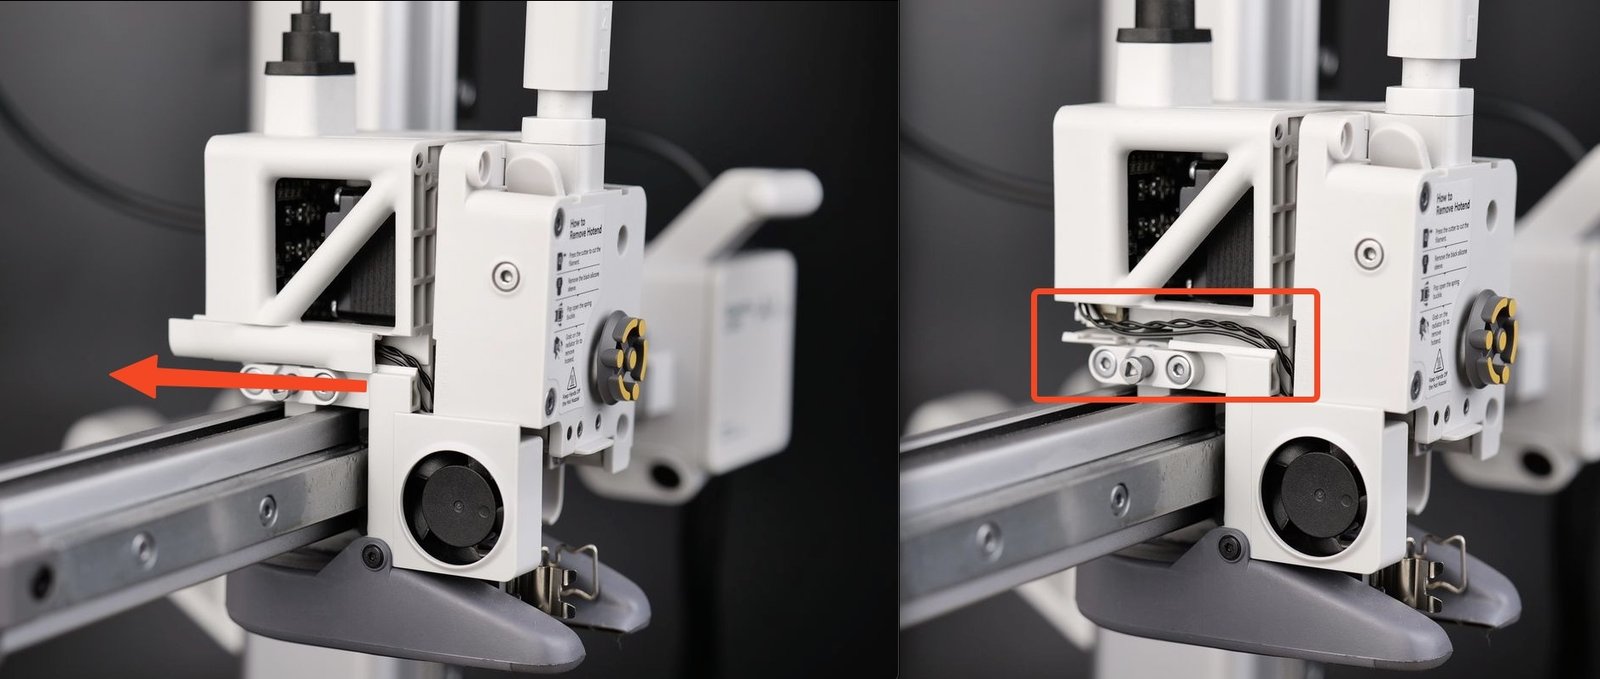
Once you remove the cable channel, you can pull the extruder towards you to completely remove it from the printer.
10. Remove the 4-in-1 buffer and sensor
The final step is to remove the 2 screws holding the 4-in-1 buffer attached to the extruder.
Then, gently raise it upwards and place it on the top of the print head.
Avoid pulling hard on it, as you risk damaging the ribbon cable of the filament sensor.

Install the new Extruder Unit
1. Install the 4-in-1 buffer and sensor to the extruder
Start by attaching the extruder temporarily to the print head, to install the filament buffer we just removed.
Then, gently push the filament buffer back in place.

2. Route the fan and eddy sensor wires through the wire channel
Carefully arrange the fan wire and the extruder sensor wire through the wire channel, as shown in the image below.
You can push the cable channel cover back by sliding it on the small clips from the hotend.

Please take extra care when routing the wires, as you will need to carefully guide them like in the image below
If the wires are not routed as shown in the image, you will not be able to re-attach the extruder.

3. Re-attach the extruder to the print head
With the cable channel installed you can secure the extruder to the print head using the four screws, as shown in the image below.
4. Attach the Toolhead Board to the housing
Open the clip on the TH Board for the ribbon cable, then gently push the cable into the connector and close the clip. A crisp “click” sound indicates that the FPC is locked.

Carefully route the Extruder Motor cable next to the ribbon cable as shown in the image below.
After this step is done, you can gently push the Toolhead Board back in its position.

5. Install the TH board screws
Use the three black screws to re-attach the Toolhead Board back to the print head.

Important!
Do not overtighten the screws to avoid any potential damage
6. Re-connect all the cables
With the new Toolhead Board back in its original position, you can re-connect all the wires as shown below.
- Hotend Heating Assembly
- Extruder Motor
- Hotend Cooling Fan
- Part Cooling Fan
- Eddy Sensor wire
- Eddy Sensor wire

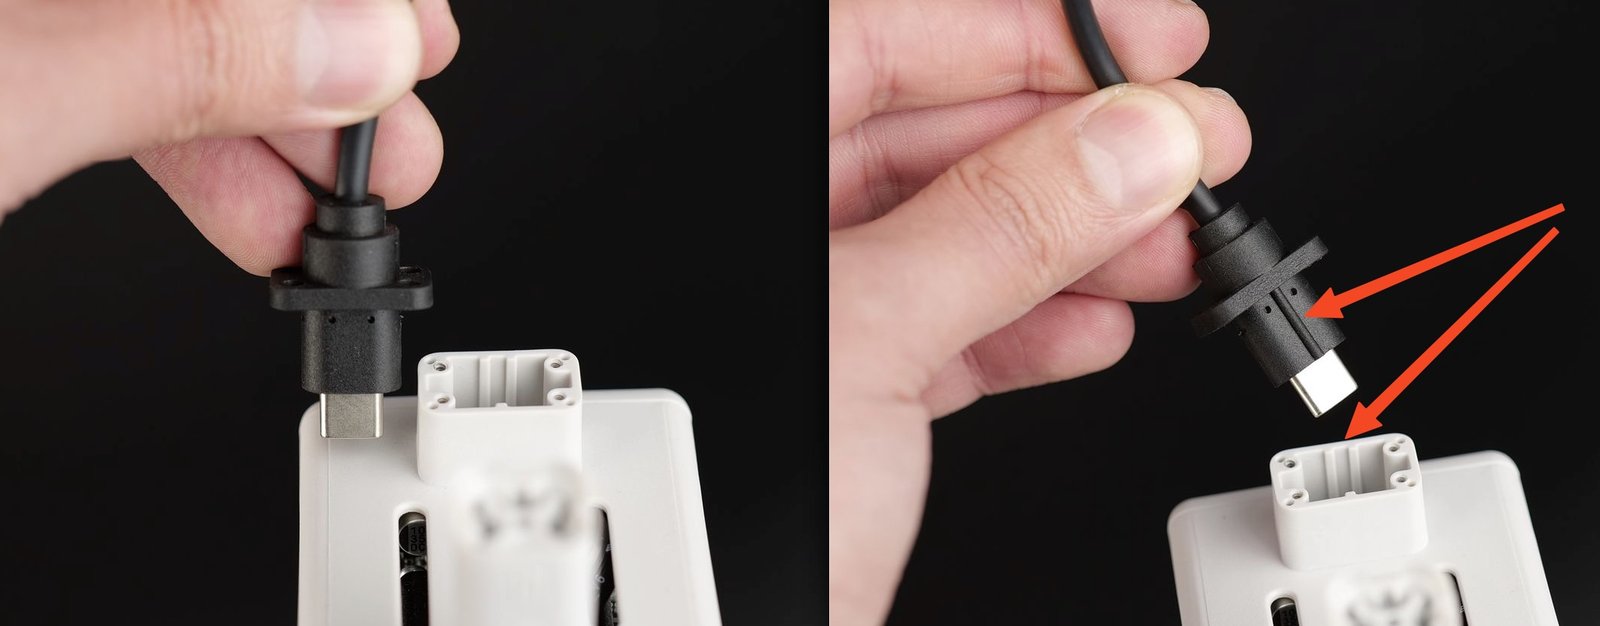
7. Re-connect the USB-C cable
Re-install the USB cable using the four screws we removed in the first step, while being careful about the orientation.

Important!
Do not over-tighten these screws, as the threads can damage the plastic.
Take note of the USB cable orientation and the small groove from the back that aligns it.
The USB C cable only fits in one position, with the correct orientation having the line in the cable connector aligned to the back of the printer and tool head.
8. Install the print head back cover
Finally, install the back cover of the A1 mini print head.
The back cover clips in place. Simply align the two brackets on the back cover towards the top, then push it until you hear a few clicks.

9. Install the hotend and silicone sock
Follow the guidance available on the extruder sticker to re-attach the hotend to the print head
Then, lock it in place using the clip and install the silicone sock.
10. Install the print head front cover
The print head front cover can now be re-installed. Simply attach it on the top of the print head by aligning the clips, then gently push on the bottom side.
You will hear the clips when the installation is complete.

Verify the functionality
Turn on the printer and start a filament loading procedure.
If the operation is successful, the motor should be heard and the entire loading procedure should work as expected
Calibration step after the operation
We recommend conducting a full calibration of the printer after this operation.
Additionally, it’s strongly advised to wash the PEI textured plate before use, as it may have been contaminated during this process.
Potential problems and solutions
If you encounter problems during the installation of a new Extruder, please check the potential problems and solutions listed below:
The hotend temperature is 0
Check the Hotend Heating Assembly connector and confirm it is correctly inserted, as shown in Passo 6. Re-connect all the cables
It is important to carefully align the connector pins to the Toolhead Board.
If the issue persists, the thermistor wires might have been damaged (white wires)
The hotend cannot be heated
Check the Hotend Heating Assembly connector and confirm it is correctly inserted, as shown in Passo 6. Re-connect all the cables
It is important to carefully align the connector pins to the Toolhead Board.
If the issue persists, the heater wires might have been damaged (Translucent wires)
Printer is not homing correctly
Check the Eddy Sensor wires (5 and 6) and confirm they are correctly installed on the back of the Toolhead Board, as shown in Passo 6. Re-connect all the cables
Filament sensor is not working
Check the Ribbon Cable and confirm it is correctly installed on the back of the Toolhead Board, as shown in Passo 4. Attach the Toolhead Board to the housing
If the ribbon cable is damaged, you will need to replace the Filament Sensor.
Notas Finais
Esperamos que o guia detalhado fornecido tenha sido útil e informativo.
To ensure a safe and effective execution, if you have any concerns or questions about the process described in this article, we recommend reaching out to technical support team before initiating the operation. We will do our best to respond promptly and provide the assistance you need. Click here to open a new ticket in our Support Page.


