
Replace H2D/H2C Toolhead Camera
Bambu Lab H2D • Série Comercial H2
Replace H2D/H2C Toolhead Camera
Tip: The camera is designed for printer functions only. Please ensure the camera is correctly installed so that the camera field of view is correctly pointing towards the print area, to avoid any detection issues of the build plate or nozzles.
Important Reminder
The part cooling fan connectors on the H2D feature this compact connector design. When removing the connector, please hold the base of the connector with your hand and lift straight up, perpendicular to the PCB surface, to unlock it. Never apply force in the horizontal direction to avoid damaging the connector.

Toolhead Camera
The toolhead camera (1080p 30fps) is installed on the right side of the toolhead. It can be used for motion accuracy calibration, high-precision nozzle offset calibration, build plate and laser platform identification code recognition. The toolhead camera and accessories included:
-
Toolhead camera × 1
-
M2×5 screws × 2


Tools and materials needed
- New toolhead camera
-
H2.0 Allen key
-
H1.5 Allen key
Specifications and quantities of screws involved in replacing the H2D toolhead camera (it is recommended to keep the removed screws properly to avoid loss):
| Specification&##x20; | Image | Use | Position | Quantity | |
|---|---|---|---|---|---|
| M2x5 | Fix the right hotend cooling fan air duct |  |
2 | ||
| Fix the toolhead camera bracket |  |
2 |
Aviso de Segurança
IMPORTANT!
It’s crucial to power off the printer before conducting any maintenance work, including work on the printer’s electronics and tool head wires. Performing tasks with the printer on can result in a short circuit, leading to electronic damage and safety hazards.
During maintenance or troubleshooting, you may need to disassemble parts, including the hotend. This exposes wires and electrical components that could short circuit if they contact each other, other metal, or electronic components while the printer is still on. This can result in damage to the printer’s electronics and additional issues.
Therefore, it’s crucial to turn off the printer and disconnect it from the power source before conducting any maintenance. This prevents short circuits or damage to the printer’s electronics, ensuring safe and effective maintenance. For any concerns or questions about following this guide, we recommend submitting a chamado técnico relatando o seu problema. and we will do our best to respond promptly and provide the assistance you need.
Remove the Toolhead Camera
Passo 1: Remove the part cooling fan air duct, fan and extruder connection board
You can refer to this Wiki to remove the following in order:
-
Part cooling fan air duct
-
Part cooling fan
- Extruder connection board
Remove the Extruder Connection Board/TH Board/FPC Cable
Passo 2: Remove the right hotend cooling fan air duct
First remove the toolhead front cover and the right hotend, then use an H1.5 Allen key to remove the 2 fixing screws (M2x5), and pull the right hotend fan air duct out of the toolhead at an angle.


Passo 3: Remove the toolhead camera
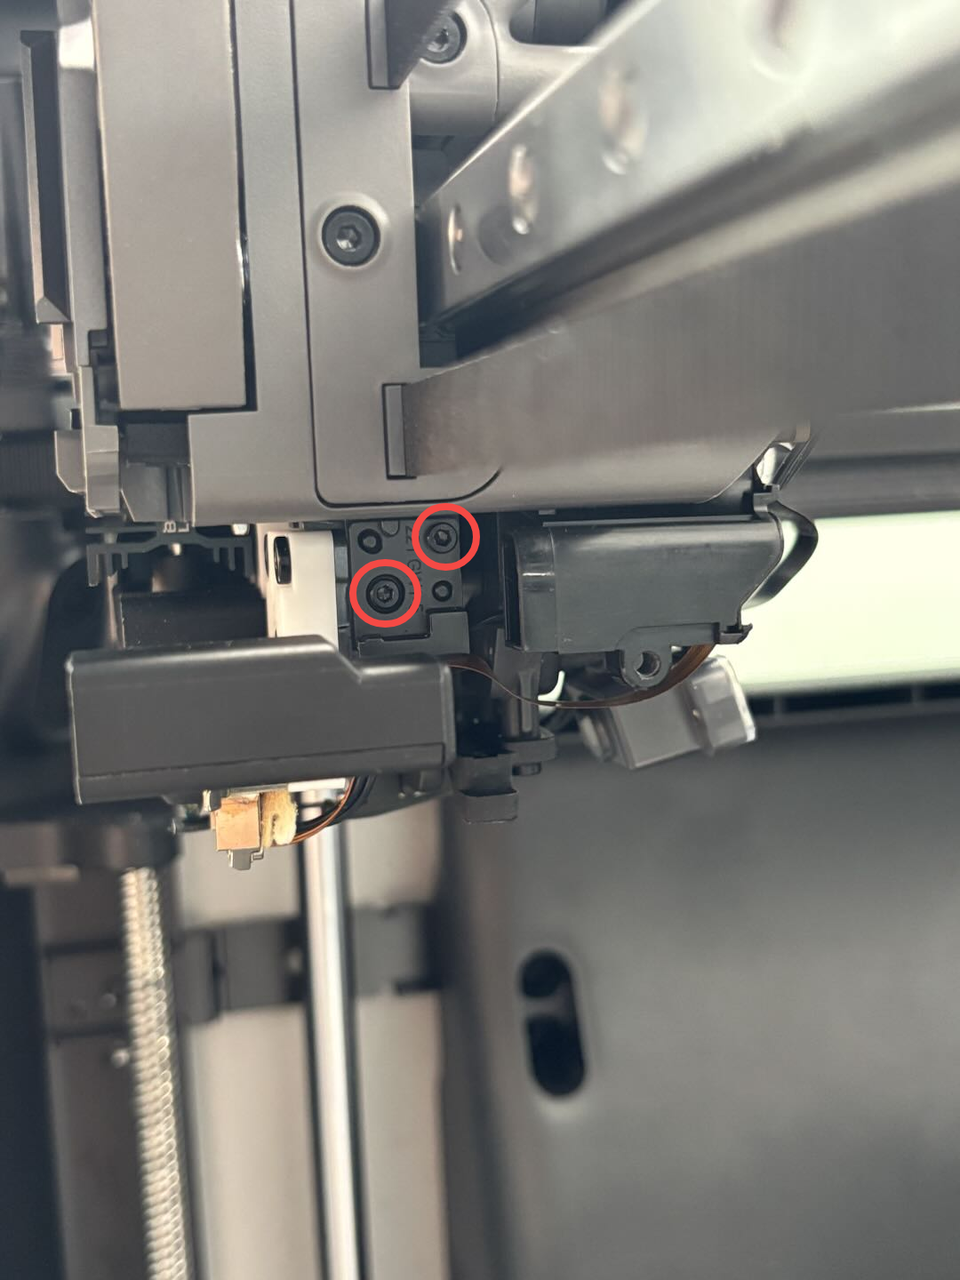
First, unplug the right hotend heating assembly connector from the TH board on the toolhead, unfasten the buckle on the toolhead camera cable, and pull the cable out of the interface. Then use an H1.5 Allen key to remove the 2 toolhead camera bracket fixing screws (M2x5), remove the right hotend heating assembly connector from the buckle on the toolhead camera, and remove the toolhead camera.


Install the Toolhead Camera
Passo 1: Install the toolhead camera
Insert the right hotend heating assembly connector into the cable buckle of the toolhead camera, then align the toolhead camera bracket with the screw hole, and use an H1.5 Allen key to tighten the two toolhead bracket fixing screws (M2x5); insert the toolhead camera connector into the connector and make sure to buckle it after aligning it. Then align the right hotend heating assembly with the plug on the TH board and re-insert the cable.


Passo 2: Install the right hotend cooling fan air duct
Insert the right hotend cooling fan air duct into the toolhead at an angle, and tighten the 2 fixing screws (M2x5) with an H1.5 Allen key; then install the right hotend into the right hotend heating assembly, fasten the buckle, and then install the silicone sock for hotend.


Passo 3: Install the extruder connection board, part cooling fan and air duct
You can refer to this Wiki to install the following in order:
-
Extruder connection board
-
Part cooling fan
-
Part cooling fan air duct
Remove the Extruder Connection Board/TH Board/FPC Cable
Verifying Success
✅ Connect the power supply, turn on the printer, and no related error message appears.
If you encounter any issues, please retrace your steps and check all connections before trying again. If the problems persist, please contact the Bambu Lab service team for further assistance.
Notas Finais
We hope this guide has provided clear and practical support.
If the issue remains unresolved, please submit a support ticket and include your recent printer logs and additional pictures or other details. Our customer support team will review your request and provide detailed assistance.
You can also visit Bambu AI, which can instantly answer common questions and provide you with operational guidance.


