
Idler Pulley Replacement Guide for the P2S/X2D
Bambu Lab P2S • Série Performance P2
Idler Pulley Replacement Guide for the P2S/X2D
Idler Pulley
An idler pulley or idler is a smooth or toothed free-spinning pulley mounted on a bearing that redirects or tensions the timing belts driving the core-XY motion system of the P2S.
The P2S uses a total of 12 idler pulleys, and the positions and number of the idlers are as follows:
- One idler pulley each on the front left and front right
- Two idler pulleys on the back left and two on the back right
- Two XY belt tensioners with one idler each
- Two idlers on the left and two on the right Y rollers

Each Idler Pulley package contains:
- One idler pulley wheel
- One 4×16.5 idler shaft
When to Use This Guide
- Idler pulley deformation or wear
Required Tools and Materials
- New Idler Pulley
- H2.0 Allen key
Disassembly Instructions
- Before replacing the idler pulleys on the core-XY system, it is necessary to loosen the XY tensioner screws first, so that the belt is in a more relaxed state, and the XY belts should be tightened again after the replacement is completed.
- Since the disassembly operation of the idler pulley on the left and right sides of the XY system is the same, this guide will show the right side as an example, and the operation on the left side is the same.
- The idler on the Y-axis roller cannot be replaced separately, only with the X-axis component.
Aviso de Segurança
IMPORTANT!
Always power off and disconnect power on the printer before performing maintenance work. Not doing so means there is a risk of electric shock, short circuit, and damage to the printer or surrounding area.
When a maintenance task necessitates the printer being powered on, use insulated gloves for safety and pay special care not to pinch, damage, or put pressure on any exposed wires, connectors, or circuit boards. Additionally, the nozzle can be extremely hot so never touch it with exposed skin.
If you have any questions or concerns related to the above or the steps in this guide, please open a new ticket in our Support Page for assistance.
Replacing the Back Right (or Left) Idler Pulley
Passo 1: Loosen Tensioner Screws
Loosen the two pairs of tensioner screws with a H2.0 hexagonal wrench to loosen the XY belt for the coming steps.

Since replacing the idlers will require the belts to be relaxed, we loosen the tensioner screws to allow this.
Passo 2: Remove the Idlers
Use the H2.0 Allen key to loosen the three screws shown below to remove the idler bracket in the back right corner.
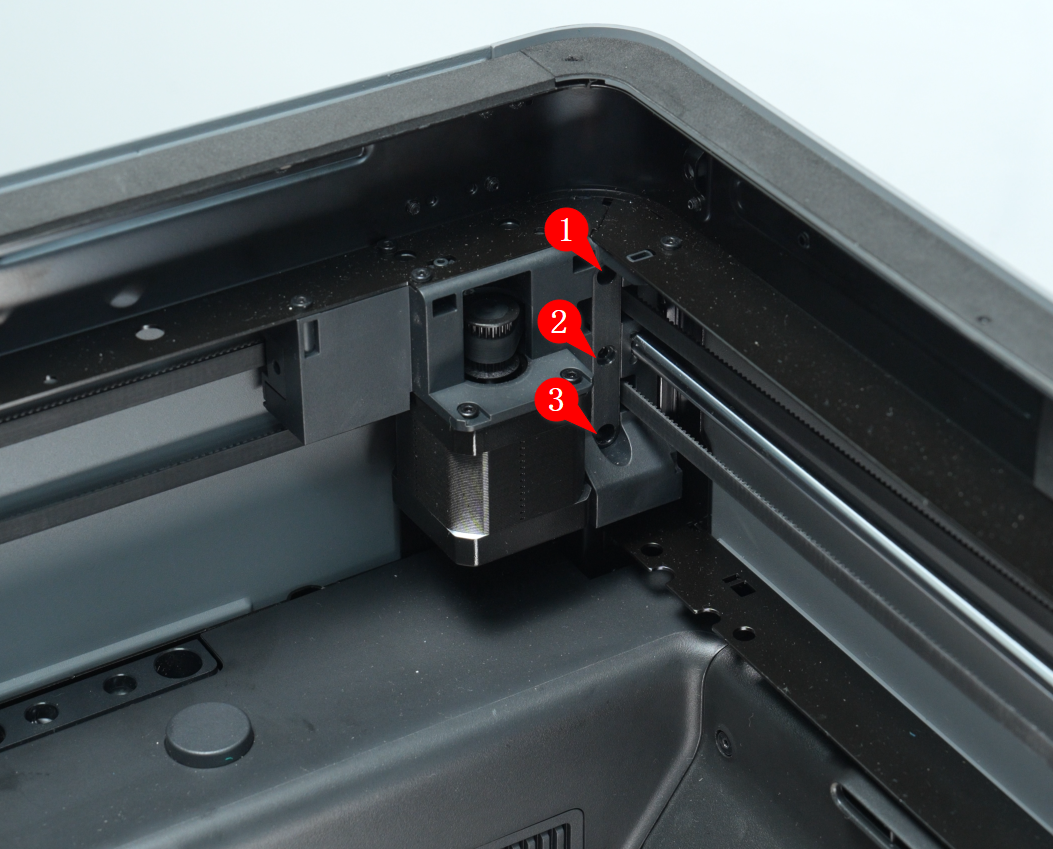 |
 |

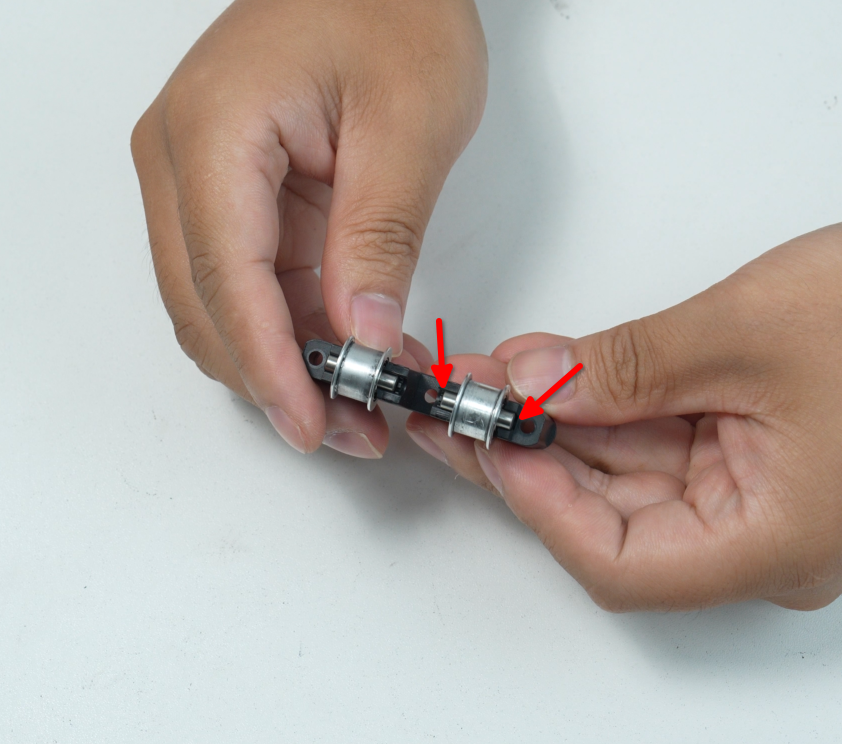
The bracket has two idlers, which can be replaced as needed (based on wear or damage). The idlers and their shafts may need to be pried out of their positions with a prying tool (a hex wrench should also work).
 |
 |
Passo 3: Install New Idlers
Insert a shaft through the center of the new idler so that it is centered. Align the shaft with the slots in the bracket, then press on the idler or idler shaft until both ends of the shaft are fully inserted into the slots. The idler should be straight and spin freely.
When installing a new idler, it is recommended to add lubricating oil to the idler shaft.
 |
 |
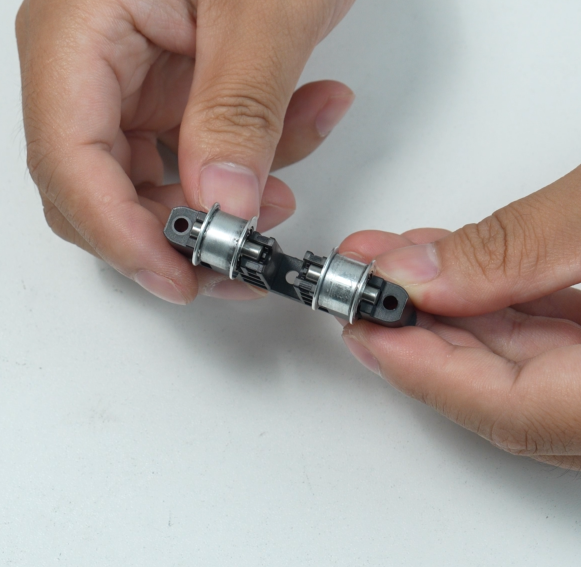
With both idlers replaced, reinstall the idler bracket and screw in all three screws with the H2.0 Allen key.
|
|
Passo 4: Tighten the XY Belt
If not replacing any more idler pulleys, move the toolhead forward and backward and left and right 3 to 5 times. Then re-tighten all four tensioning screws in the back of the printer.
Replacing the Front Right (or Left) Idler Pulley
Passo 1: Loosen Tensioner Screws
Loosen the two pairs of tensioner screws with a H2.0 Allen key to loosen the XY belt (if not already loose from replacing other idlers).
Passo 2: Remove the Front Idler Pulley
Use the H2.0 Allen key to remove the three screws (M2.5×5) of the belt fixing block and remove the belt from the toolhead.

Remove the two screws with the H2.0 Allen key to remove the idler pulley cover in the front right corner of the enclosure.
 |
 |
Push the belt in toward the idler until it pushes the idler out of its slot. Remove the idler and shaft to inspect and replace if necessary.
 |
 |
Passo 3: Install the New Idler
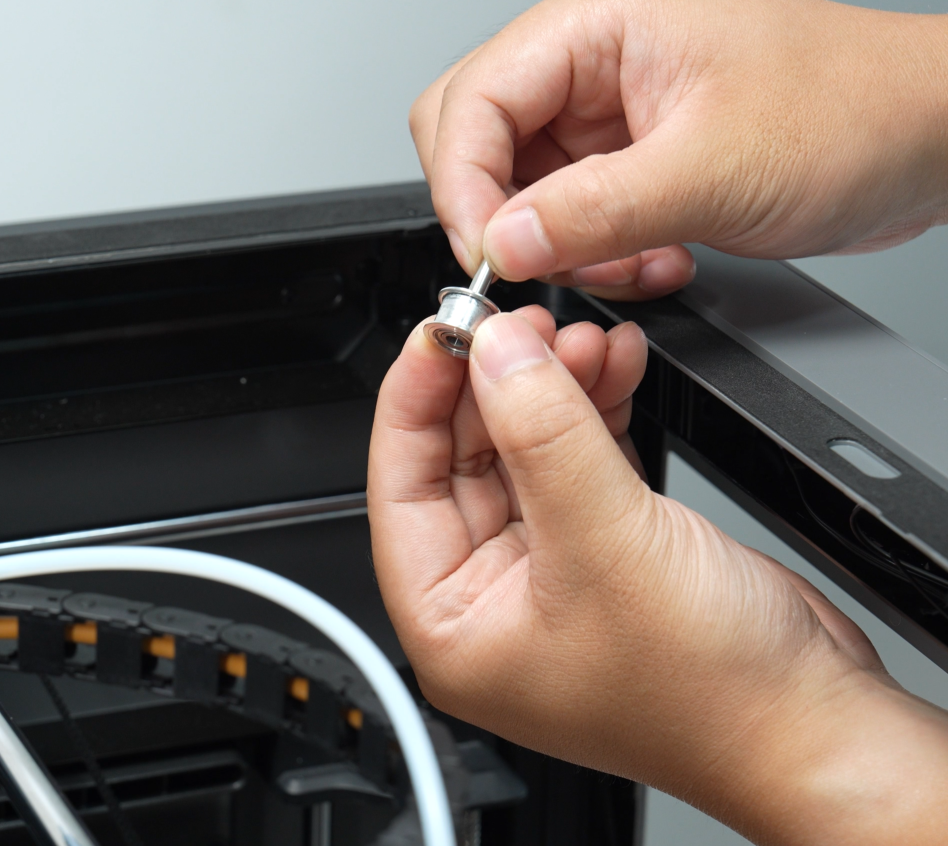
Insert a shaft into the idler, feed the belt loop through the idler slot area as it was before removal, and loop the belt around the idler.
When installing a new idler, it is recommended to add lubricating oil to the idler shaft.
 |
 |
Push the idler and the belt into the idler slot together. Pull both sides of the belt from the other end to aid in pushing the idler fully back into its correct position. Note: Be sure the idler shaft does not fall out of the idler when maneuvering them both into place.
 |
 |
Reinstall the idler pulley cover and tighten its two screws with the H2.0 Allen key.

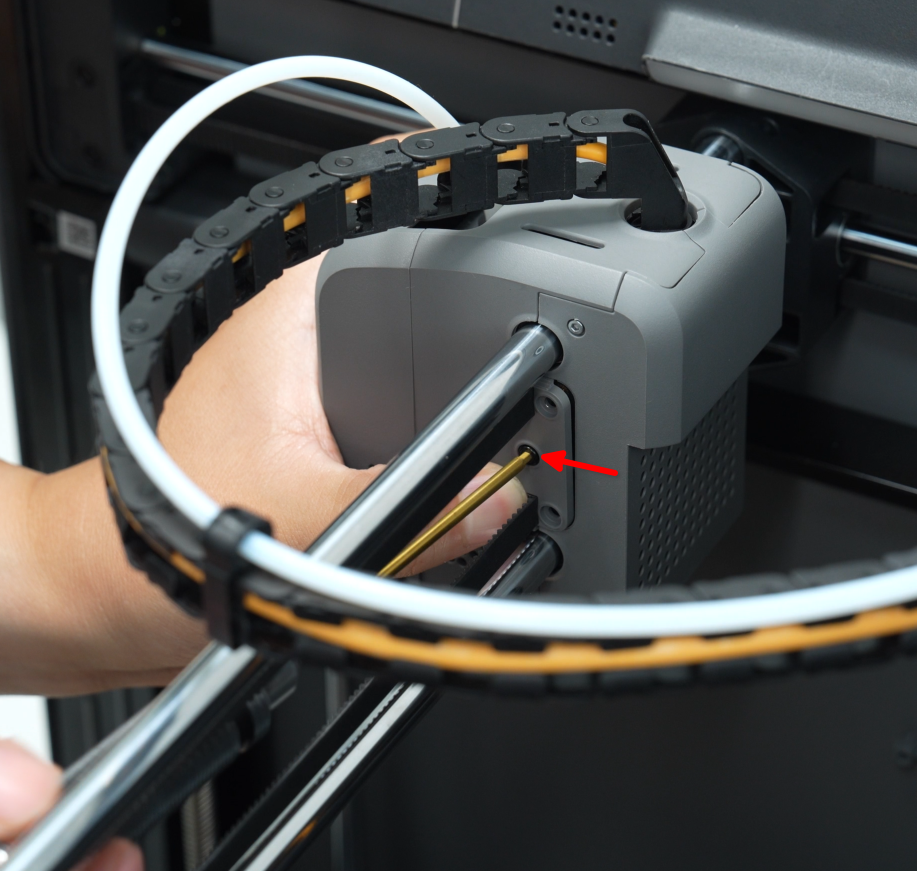
Reinstall the belt fixing block into the toolhead and tighten the central screw then the two additional screws on the top and bottom with the H2.0 Allen key.
 |
|
Passo 4: Tighten the XY Belt
If not replacing any more idler pulleys, move the toolhead forward and backward and left and right 3 to 5 times. Then re-tighten all four tensioning screws in the back of the printer.
Replacing the XY Tensioner Idlers
If the tensioner bracket is damaged, you’ll need to replace the entire tensioner. Please refer to the guidelines XY Belt Replacement Guideto complete that process*.*
Passo 1: Remove Blocking Components
You can refer to the following wiki pages to remove the PTFE tube bracket, filament buffer and rear panel in turn, so that the two tensioners are completely exposed.
PTFE Tube Bracket Replacement Guide
Filament Buffer Replacement Guide
P2S Rear Panel Replacement Guide
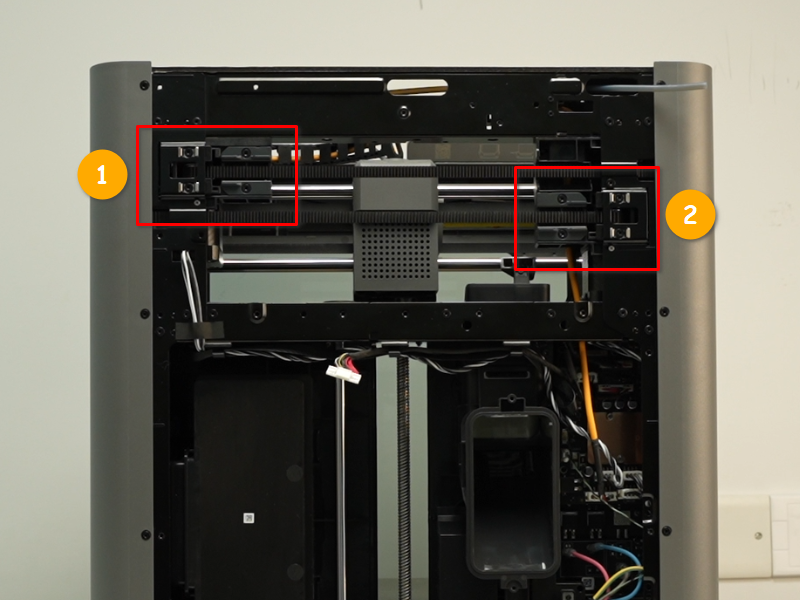
Passo 2: Remove the XY Tensioner Fixing Bracket
Use the H2.0 Allen key to fully unscrew and remove both tensioner screws as well as their metal brackets. The right tensioner (when viewed from the front of the printer) is shown in this example.
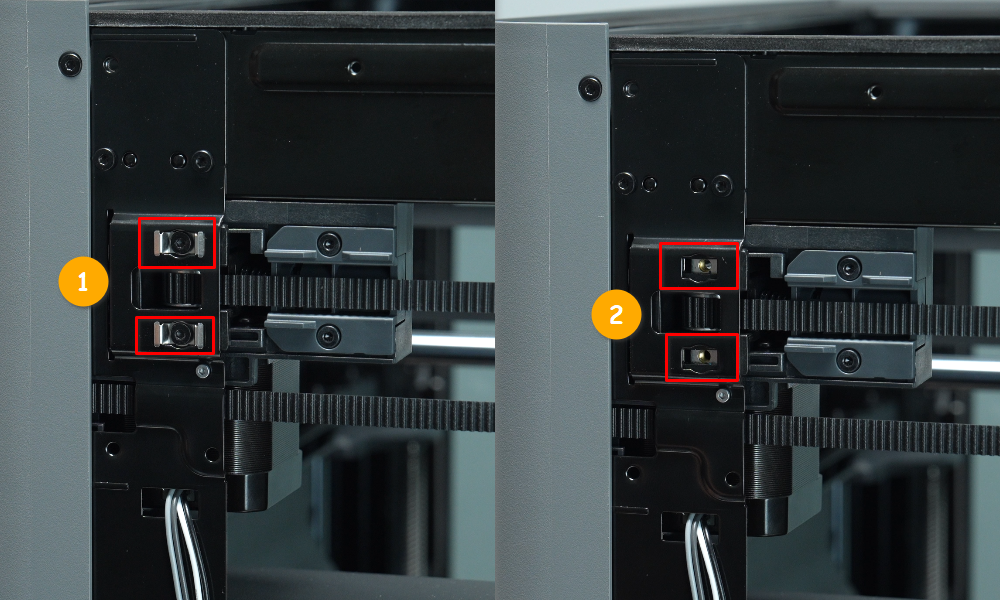
Use the H2.0 Allen key to remove the two screws for the tensioner fixing bracket, then remove the bracket and tensioner mounting brackets and springs.

Passo 3: Remove the XY Tensioner Idler
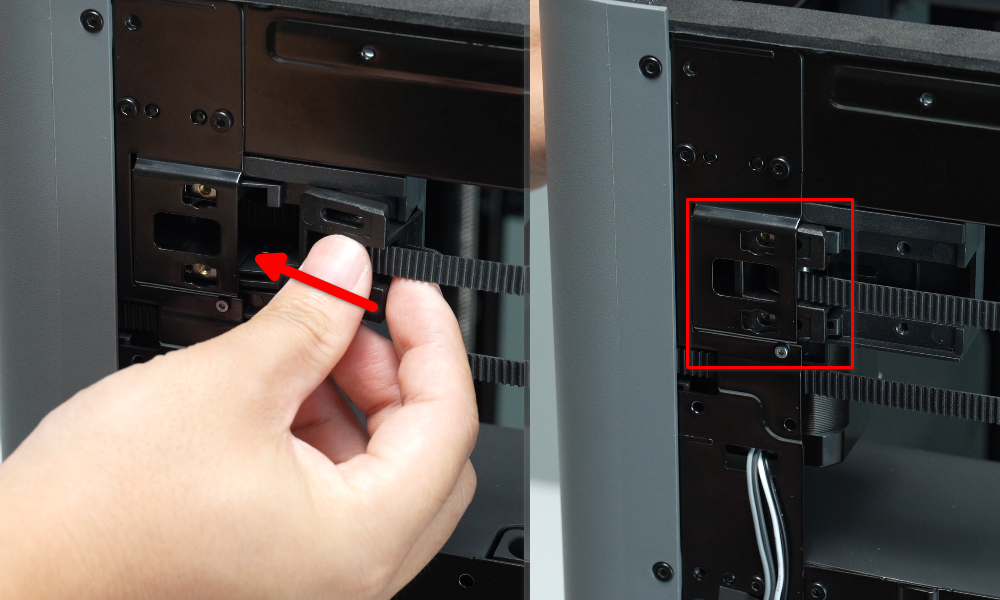
Pull on the belt until the tensioner bracket comes out as shown below.

Use an Allen key to push the idler shaft through the bracket and free the idler wheel itself.

Passo 4: Reinstall the XY Tensioner Idler
Ensure that the belt teeth face out and the spring pillar (pictured) faces up.

Place the idler wheel into the tensioner bracket and line it up with the shaft holes. Insert the shaft through the bracket and idler until it is flush on both sides, making sure that the idler is stationary but spinning freely.

Slide the XY tensioner bracket into place without replacing the screws yet.
Passo 5: Reinstall the XY Tensioner Fixing Bracket
Replace the spring on the tensioner bracket, then the tensioner fixing bracket. Replace and tighten the two tensioner fixing bracket screws.

Reinstall the metal brackets and tensioning screws.

Passo 6: Install the Rear Panel
You can refer to the earlier mentioned wiki pages to replace the PTFE tube bracket, filament buffer and rear panel in turn.
PTFE Tube Bracket Replacement Guide
Filament Buffer Replacement Guide
P2S Rear Panel Replacement Guide
Passo 7: Tighten the XY Belt
If not replacing any more idler pulleys, move the toolhead forward and backward and left and right 3 to 5 times. Then re-tighten all four tensioning screws in the back of the printer.
For details, please refer to: P2S Belt Tensioning
Verifying Functionality
Connect the power supply, turn on the printer, run the printer self-test process, and monitor the testing process for any abnormal noises or errors.
If you encounter any problems, check the belts and idlers for proper placement and movement. If the problem persists, please contact the Bambu Lab customer service team for further assistance.
Notas Finais
We hope this guide has provided clear and practical support.
If the issue remains unresolved, please submit a support ticket and include your recent printer logs and additional pictures or other details. Our technical team will review your request and provide detailed assistance.
You can also visit Bambu AI, which can instantly answer common questions and provide you with operational guidance.


