
PTFE Tube Bracket Replacement Guide for the P2S/X2D
Bambu Lab P2S • Série Performance P2
PTFE Tube Bracket Replacement Guide for the P2S/X2D
PTFE Tube Bracket
The PTFE tube bracket is mounted on the back of the P2S to provide secure attachment of the PTFE tube (also known as a Bowden tube) which provides a low friction path for filament into the printer.

Applicable Models
- P2S
- X2D
When to Use This Guide
- Damage or dysfunction of the spring loaded PTFE fitting
- Damage to the plastic bracket itself
Required Tools and Materials
- New PTFE tube bracket
Aviso de Segurança
IMPORTANT!
Always power off and disconnect power on the printer before performing maintenance work. Not doing so means there is a risk of electric shock, short circuit, and damage to the printer or surrounding area.
When a maintenance task necessitates the printer being powered on, use insulated gloves for safety and pay special care not to pinch, damage, or put pressure on any exposed wires, connectors, or circuit boards. Additionally, the nozzle can be extremely hot so never touch it with exposed skin.
If you have any questions or concerns related to the above or the steps in this guide, please open a new ticket in our Support Page for assistance.
Installation Tip:
Please remove any filament which may be fed into the printer before starting this process, as filament still in the tube will interfere with proper bracket replacement.
Removing the PTFE Tube bracket
Passo 1: Remove the PTFE Tube
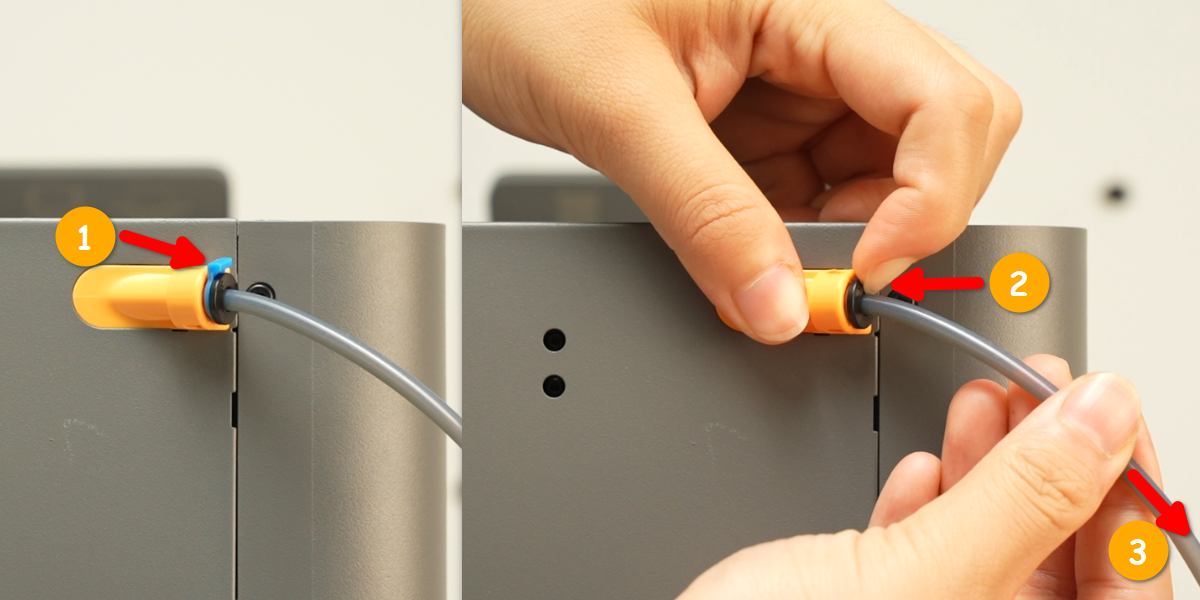
Remove the blue clip from the PTFE fitting, compress the PTFE fitting, and pull the PTFE tube out of the fitting.
Passo 2: Remove the PTFE Tube Bracket
Slide the bracket to the right to unlock it so it may be pulled from the printer frame.

Compress the PTFE fitting on the other side of the bracket and pull the bracket away from the internal PTFE tube.

Installing the PTFE Tube Bracket
Passo 1: Connect the Internal PTFE Tube
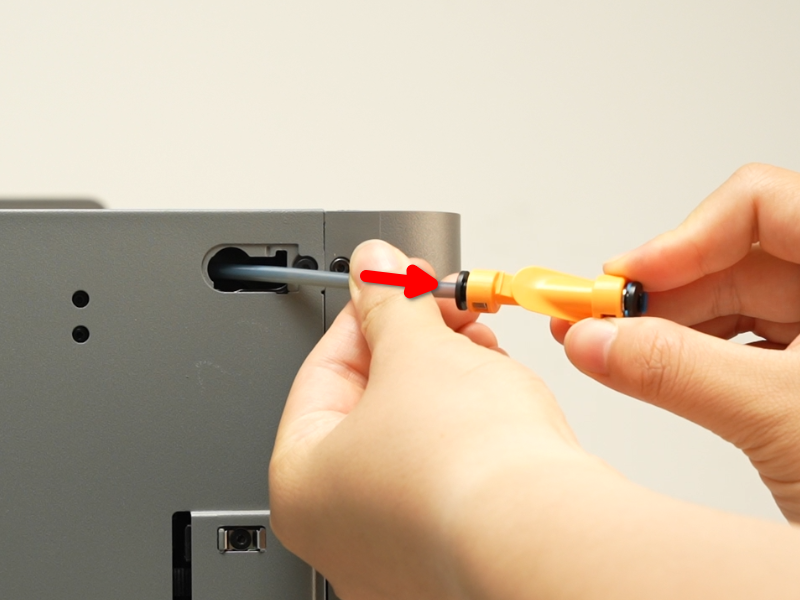
Connect the replacement PTFE tube bracket to the internal PTFE tube by pressing it into the inner PTFE tube fitting until it cannot be inserted any more. Make note of the correct orientation of the bracket in the image below.
Passo 2: Install the PTFE Tube Bracket
With the inner PTFE tube attached, insert the bracket into the frame of the printer through the larger portion of the bracket’s hole. Then, align the small tab on the back of the bracket with the small notch of the bracket’s hole and insert it (as shown in the second image below). Then, push the bracket to left to lock it in place.


Align the small tab with the small notch |
Connect the external PTFE tube to the bracket by pressing it into the outer PTFE tube fitting until it cannot be inserted any more. Replace the blue clip around the PTFE fitting to secure it in the locked position.

Verifying Functionality
Wiggle the inner PTFE tube, the bracket itself, and the outer PTFE tube to ensure everything is secured. Feed some filament through the outer PTFE tube and ensure that it inserts all the way to the print head without obstruction.
Notas Finais
We hope this guide has provided clear and practical support.
If the issue remains unresolved, please submit a support ticket and include your recent printer logs and additional pictures or other details. Our technical team will review your request and provide detailed assistance.
You can also visit Bambu AI, which can instantly answer common questions and provide you with operational guidance.


