
Toolhead Housing Replacement Guide for the P2S
Bambu Lab P2S • Série Performance P2
Toolhead Housing Replacement Guide for the P2S
Toolhead Housing
The Toolhead Housing consists of three main parts:
- Toolhead Front Cover Assembly: Includes the front cover housing and part-cooling fan, secured to the Toolhead Middle Frame via magnets.
- Toolhead Rear Cover: A plastic enclosure designed to seal the rear part of the toolhead.
- Toolhead Middle Frame: A central plastic housing with magnets for front cover attachment.


When to Use This Guide
Toolhead Front Cover
- Physical damage, including magnet detachment.
- Part-cooling fan malfunction.
Toolhead Rear Cover
- Physical damage
Toolhead Middle Frame
- Physical damage, including magnet detachment.
Required Tools and Materials
- H1.5 Allen key
- A new Toolhead Front Cover/Toolhead Rear Cover/Toolhead Middle Frame
Aviso de Segurança
IMPORTANT!
Always power off and disconnect power on the printer before performing maintenance work. Not doing so means there is a risk of electric shock, short circuit, and damage to the printer or surrounding area.
When a maintenance task necessitates the printer being powered on, use insulated gloves for safety and pay special care not to pinch, damage, or put pressure on any exposed wires, connectors, or circuit boards. Additionally, the nozzle can be extremely hot so never touch it with exposed skin.
If you have any questions or concerns related to the above or the steps in this guide, please open a new ticket in our Support Page for assistance.
Removing the Toolhead Housing
Passo 1: Remove the Toolhead Front Cover
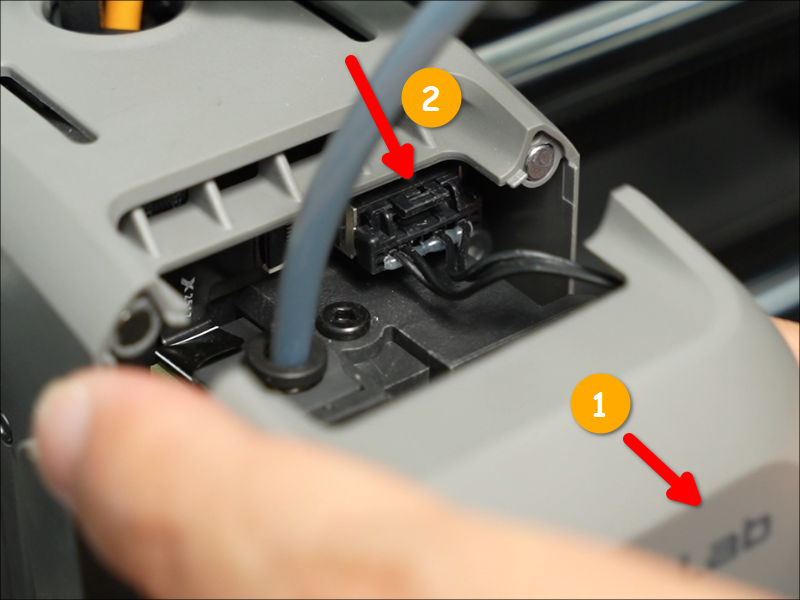
Open the Toolhead Front Cover, press the connector latch to unplug the cable, and then remove the Toolhead Front Cover.
Passo 2: Remove the Toolhead Rear Cover
Remove the four screws with an H1.5 Allen key.

Grip the Rear Cover near the upper rod, then pull it backward firmly to detach it.

Passo 3: Remove the Toolhead Middle Frame
Remove the four screws with an H1.5 Allen key.

Rotate the cable chain bracket to align it with the notch at the top of the Middle Frame, then gently lift the bottom of the Middle Frame upward to release it.

Detach the Toolhead Middle Frame from the cable chain bracket, then remove it.

Installing the Toolhead Housing
Passo 1: Install the Toolhead Middle Frame
Align the notch on the Printhead Middle Frame with the cable chain bracket, then slide it into position.

Install the Middle Frame and secure it with the four screws.
Passo 2: Install the Toolhead Rear Cover
Install the Toolhead Rear Cover, then secure it with four screws.
 |
|
Passo 3: Install the Toolhead Front Cover
Connect the Toolhead Front Cover cable to the Extruder Connection Board connector.

The Toolhead Front Cover Assembly is magnetically secured. To reinstall, simply close it into position.

Verifying Functionality
-
Check the gaps between the housing parts to ensure there is no visible misalignment or lifting.
-
Verify that the part-cooling fan turns on and off normally.
Notas Finais
We hope this guide has provided clear and practical support.
If the issue remains unresolved, please submit a support ticket and include your recent printer logs and additional pictures or other details. Our technical team will review your request and provide detailed assistance.
You can also visit Bambu AI, which can instantly answer common questions and provide you with operational guidance.


