
Replace P2S/X2D Z Motor
Bambu Lab P2S • Série Performance P2
Replace P2S/X2D Z Motor
Z motor
The Z motor is a stepper motor that drives the hot bed in the Z-axis direction through the Z-axis synchronous belt. It comes with a motor cable and a driving pulley.

When to replace
- The Z motor is burned out and cannot move
- After-sales personnel analyzed the logs and confirmed that the fault was with the Z motor.
Required Tools and Materials
- H2.0 Hexagon wrench
- H1.5 hexagon wrench
- New Z motor
Safety Tips
Important reminder!
Before performing any maintenance on the printer and its electronics (including the tool head cable), turn off the printer and disconnect the power cord to avoid short circuits that could cause additional damage to the electronics and potentially lead to safety hazards.
When performing maintenance or troubleshooting on your printer, please first confirm the temperature of the hot end and heated bed and avoid operating under high temperature conditions. If you must operate under high temperature conditions, please wear heat-insulating gloves to ensure that maintenance work is performed safely and effectively.
Remove the Z motor
Passo 1: Clean the Printer Base
Clean the foreign matter on the printer base, especially the residue on the polished rod, and remove the glass cover of the printer.
Passo 2: Lock the Heatbed
- The motor can still be used:
Using the display, lower the heated bed to the bottom and use an H2.0 Allen wrench to tighten the three screws and lock the three sliders, just as you did when you first unboxed the heated bed. Then, turn off the printer and disconnect the power cord.


- Situations where the motor cannot be used at all:
Turn off the printer, disconnect the power cord, tilt the printer, manually move the Z-axis belt, lower the heated bed to the bottom, and lock the three slides with three screws.

Locking the heated bed is a critical preparatory step. This effectively fixes the relative positions of the three Z-axis screws, preventing them from rotating or shifting unexpectedly due to external forces or the weight of the bed when the belts are released. This maintains the heated bed’s reference surface, preventing excessive tilt and ensuring the initial levelness of the build platform.
Passo 3: Remove the back panel
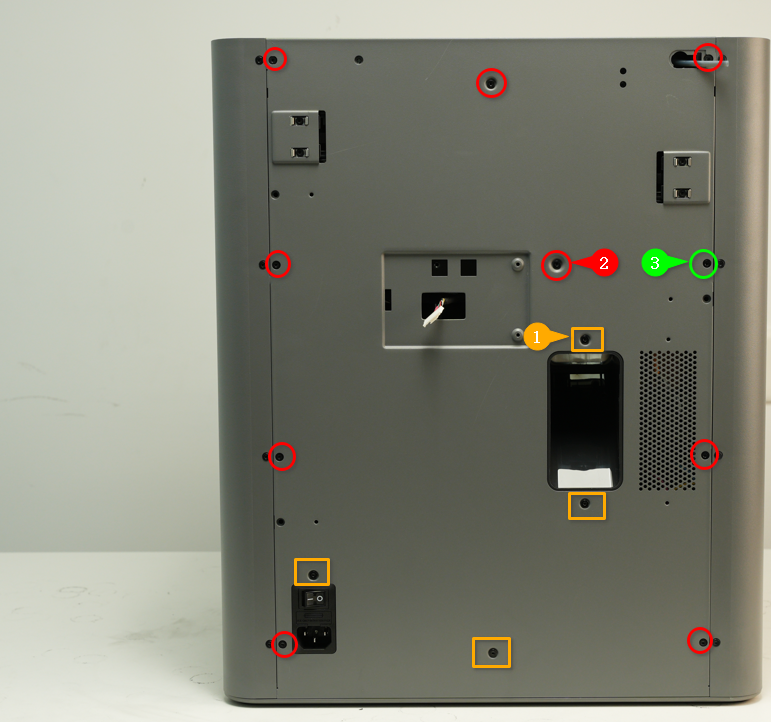
Refer to the corresponding Wiki for your printer model to remove the rear panel:
 |
 |
|---|---|
| P2S | X2D |
Passo 4: Disconnect the Motor Wires
- Find the MC board on the right side of the back of the machine and disconnect the Z motor cable at the bottom of the MC board;

- Remove the Z motor cables from the cable clips one by one;
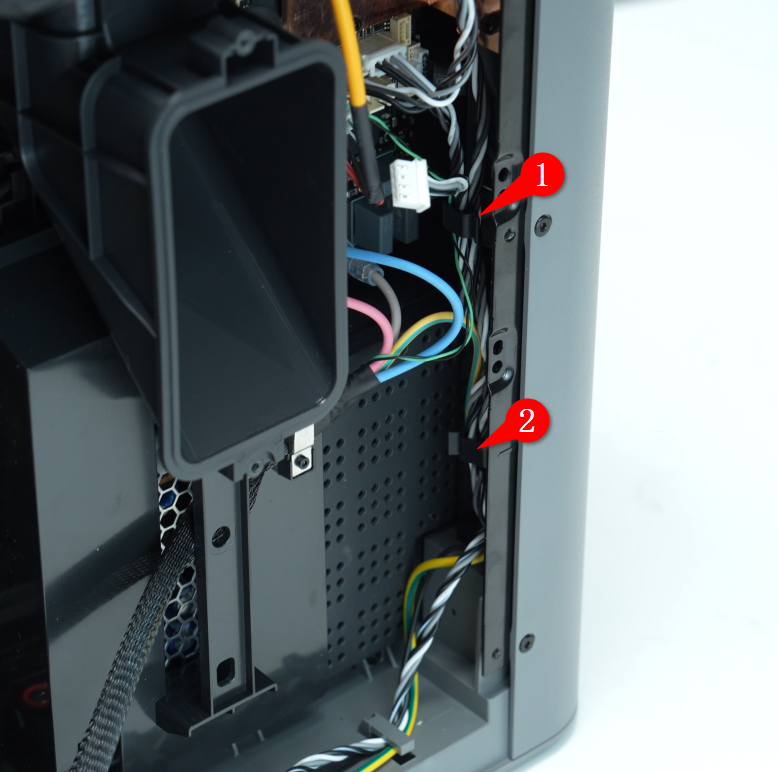

- Tear off the tape and remove the Z motor cable.

Passo 5: Release the Tension Spring and Tensioner Pulley
- Remove the top glass cover and lay the printer on its side;

If you need to turn the printer upside down, be sure to remove the display screen before turning it upside down to avoid damage! For information on how to remove the display screen, see: Replacing the Screen | Bambu Lab Wiki
- Release the spring and loosen the black screw with an H2.0 Allen key.

Passo 6: Remove the Z Motor
- Use an H2.0 Allen wrench to remove the four screws. These four screws have a high locking torque, so it is recommended to use a reliable tool to remove them, otherwise the threads may slip. When removing the last screw, hold the motor with your hand to prevent it from falling.

- Remove the Z motor from the printer at an angle.


Install the Z motor
Passo 1: Install the Z Motor
- Install the Z motor into the printer at an angle (with the motor cable facing outwards, refer to the figure below for installation). Push the motor slightly to install it, and then put the Z belt onto the motor’s driving pulley.


- Tighten the 4 screws using a diagonal screw lock method.
Passo 2: Lock the spring and the tensioner
Snap the long arm of the spring into place and screw the tensioner pulley into place.
Passo 3: Remove the slider fixing screws and check the action
- Place the printer forward and remove the locking screws on the three slides;
- Then tilt the printer and move the Z-axis belt back and forth to confirm that the heated bed can move up and down.
Passo 4: Thread the Motor Cables
Re-apply the tape to the cables, then thread the motor cables through the snap-in slots on the base and onto the side cable reliefs, just as they were before removal.
Passo 5: Install the Back Panel
Refer to the corresponding Wiki for your printer model to install the rear panel:
|
|
|---|---|
| P2S | X2D |
How to verify success
Connect the power cord and start the printer. Use the screen to control the heated bed and check whether it can rise and fall normally. If it can operate normally, the Z motor has been replaced successfully.
If the hot bed is not functioning properly, follow the instructions to troubleshoot assembly issues. Once resolved, run the device self-test again. If the problem persists, contact the Bambu Lab support team for further assistance.
Notas Finais
Esperamos que o guia detalhado fornecido tenha sido útil e informativo.
If this guide does not solve your problem, please submit a chamado técnico, we will answer your questions and provide assistance.
If you have any suggestions or feedback on this Wiki, please leave a message in the comment area. Thank you for your support and attention!


