
Auxiliary Extruder Replacement Guide for the X2D
Bambu Lab X2D • Série Avançada X2
Auxiliary Extruder Replacement Guide for the X2D
Auxiliary Extruder
🔎 Find the X2D Auxiliary Extruder Upper Cover, the X2D Auxiliary Extruder Gear Assembly, and the X2D Auxiliary Extruder Housing in the Bambu Lab store.
The auxiliary extruder is installed at the back of the printer and is used to control the feeding, stopping, and retraction of support filament.
| Package | Contents | Description |
|---|---|---|
Auxiliary Extruder Unit Package
 |
Auxiliary Extruder Unit | – |
Auxiliary Extruder Upper Cover Package
 |
|
Installed at the top of the auxiliary extruder, used to secure the auxiliary extruder gear assembly and includes the auxiliary extruder filament inlet. |
Auxiliary Extruder Gear Assembly Package
 |
|
Installed inside the auxiliary extruder, driven by the extruder motor, this gear assembly can feed filament to the hotend or retract it from the auxiliary extruder. |
Auxiliary Extruder Housing Package
 |
Auxiliary Extruder Housing | An accessory that connects to the extruder motor and fixes the auxiliary extruder onto the printer. |
Applicable Printer Model
Bambu Lab X2D
When to Replace
Common situations requiring auxiliary extruder replacement:
-
Extruder motor malfunction, unable to operate
-
Damaged auxiliary extruder cables or connectors
Common situations requiring replacement of the auxiliary extruder upper cover:
- Physical damage affecting product use
Common situations requiring replacement of the auxiliary extruder gear assembly:
- Gear wear or bearing wear causing printing anomalies
Common situations requiring replacement of the auxiliary extruder housing:
- Physical damage affecting product use
Required Tools and Materials
-
New auxiliary extruder upper cover, auxiliary extruder gear assembly, or auxiliary extruder housing
-
H 1.5 allen key
-
H 2.0 allen key
-
Wrench
-
Tweezers
When connecting the PTFE tube from the auxiliary extruder to the toolhead, make sure the insertion depth is about 22 mm. If the insertion depth is insufficient, it may cause feeding failure.
Aviso de Segurança
⚠️ IMPORTANT!
It’s crucial to power off the printer before conducting any maintenance work, including work on the printer’s electronics and tool head wires. Performing tasks with the printer on can result in a short circuit, leading to electronic damage and safety hazards.
During maintenance or troubleshooting, you may need to disassemble parts, including the hotend. This exposes wires and electrical components that could short circuit if they contact each other, other metal, or electronic components while the printer is still on. This can result in damage to the printer’s electronics and additional issues.
Therefore, it’s crucial to turn off the printer and disconnect it from the power source before conducting any maintenance. This prevents short circuits or damage to the printer’s electronics, ensuring safe and effective maintenance. For any concerns or questions about following this guide, we recommend submitting a chamado técnico relatando o seu problema. and we will do our best to respond promptly and provide the assistance you need.
Video Guide
Remove the Auxiliary Extruder
Passo 1. Remove the auxiliary extruder
Press the filament inlet pneumatic connector and pull out the filament PTFE tube.

- Use an 8mm open-end wrench to loosen the locking nut at the auxiliary extruder filament outlet and remove the tube.
ℹ️ Note: If resistance is too high when removing the tube, pull the tube from inside the printer.

-
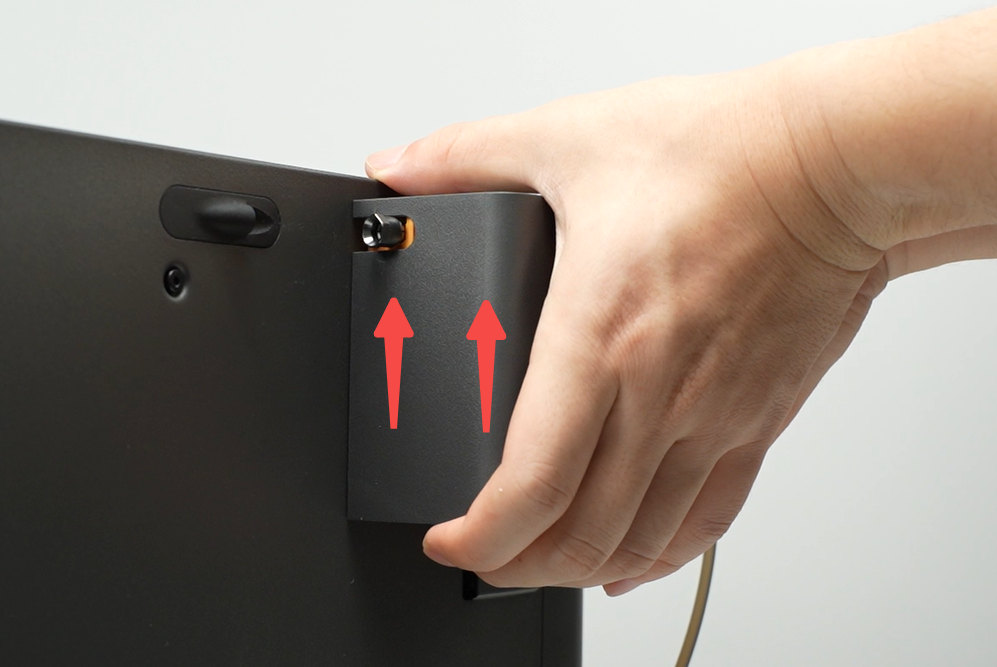
Support the auxiliary extruder with your hand and gently push upwards to unlock it from the printer.
-
Remove the connector cover on the auxiliary extruder, press the connector plug locking tab to disconnect the cable, then remove the auxiliary extruder unit.

Passo 2. Remove the auxiliary extruder housing
Align the allen key to the slot at the back of the auxiliary extruder, push the extruder motor forward to unlock and push out internal components, then remove the housing.

Passo 3. Remove the auxiliary extruder upper cover
Use an H1.5 allen key to remove seven fixing screws and take off the auxiliary extruder upper cover.

Use an H1.5 allen key to remove two fixing screws, and remove the tube connector accessory.
This operation is only required when the pneumatic connector or its structural parts suffer physical damage.

Passo 4. Remove the auxiliary extruder gear assembly
Use an H2.0 allen key to remove one fixing screw.

Remove the auxiliary extruder driven gear, drive gear, spring, and pressure plate.

Install the Auxiliary Extruder
Passo 1. Install the auxiliary extruder gear assembly
Install the auxiliary extruder drive gear and driven gear respectively, then use your hands or tweezers to install the pressure plate and spring together (the raised side of the pressure plate should face the spring, and the grooved side should face the threaded hole), then tighten one fixing screw with an H2.0 allen key.

Passo 2. Install the auxiliary extruder upper cover
Install the pneumatic connector onto the motor connector, and lock in 2 screws.

Install the auxiliary extruder upper cover onto the auxiliary extruder, and tighten the seven screws in the sequence shown using an H1.5 allen key.

Passo 3. Install the auxiliary extruder housing
Slide the assembly into the housing by aligning the auxiliary extruder driven gear handle direction along the auxiliary extruder housing installation slot.

Passo 4. Install the auxiliary extruder
-
Connect the cable to the auxiliary extruder connector, ensuring the locking tab direction is correct.

-
Insert the connector cover into the auxiliary extruder, making sure the cover’s notch faces outwards from the auxiliary extruder during insertion.

-
First retract the cable into the slot, then insert the auxiliary extruder into the hole at the back of the printer and press down to lock it in place.

-
Loosen the locking nut on the left filament outlet of the auxiliary extruder, insert the PTFE tube from the top center of the printer’s rear panel into the filament outlet about 22mm, then use an 8mm open-end wrench to tighten the auxiliary extruder filament outlet locking nut. (Please ensure the PTFE tube is fully inserted, otherwise filament may buckle inside the extruder.)

The filament tube should be inserted to a depth of approximately 22 mm. Insufficient insertion depth may cause filament feeding to fail.

If your filament tube has a gray marking sticker, you can use it to verify proper insertion. The tube is fully inserted when there is no gap between the locking nut and the sticker. If you can see the white tube exposed between the locking nut and the sticker, the tube has not been inserted far enough.

-
Insert the white PTFE tube into the auxiliary extruder filament inlet.

Verifying Success
✅ Connect the power, turn on the printer, and check if the auxiliary extruder can load and unload filament properly.
If you encounter any issues, please retrace your steps and check all connections before trying again. If the problems persist, please contact the Bambu Lab service team for further assistance.
Notas Finais
We hope this guide has provided clear and practical support.
If the issue remains unresolved, please submit a support ticket and include your recent printer logs and additional pictures or other details. Our technical team will review your request and provide detailed assistance.
You can also visit Bambu AI, which can instantly answer common questions and provide you with operational guidance.


