
Eddy Sensor Replacement Guide For the X2D
Bambu Lab X2D • Série Avançada X2
Eddy Sensor Replacement Guide For the X2D
Eddy Sensor
🔎 Find the X2D Left Eddy Sensor and X2D Right Eddy Sensor in the Bambu Lab store.
The Eddy Sensor are installed between the hotend and the extruder and serve as components for actively calibrating filament flow.
The X2D has two Eddy Sensor, located above the left hotend and the right auxiliary hotend respectively.
Left Eddy Sensor replacement kit includes:
1. Left Eddy Sensor
2. Fixing Screws ( x2 )

Right Eddy Sensor replacement kit includes:
1. Right Eddy Sensor
2. Fixing Screws ( x2 )

Applicable printer model
Bambu Lab X2D
When to Replace
- Physical damage to the Eddy Sensor can be identified;
- Z-axis homing or heatbed leveling failed, caused by the Eddy Sensor malfunction.
Required tools and materials
- New Eddy Sensor
- H1.5 allen key
Aviso de Segurança
⚠️ IMPORTANT!
It’s crucial to power off the printer before conducting any maintenance work, including work on the printer’s electronics and tool head wires. Performing tasks with the printer on can result in a short circuit, leading to electronic damage and safety hazards.
During maintenance or troubleshooting, you may need to disassemble parts, including the hotend. This exposes wires and electrical components that could short circuit if they contact each other, other metal, or electronic components while the printer is still on. This can result in damage to the printer’s electronics and additional issues.
Therefore, it’s crucial to turn off the printer and disconnect it from the power source before conducting any maintenance. This prevents short circuits or damage to the printer’s electronics, ensuring safe and effective maintenance. For any concerns or questions about following this guide, we recommend submitting a chamado técnico relatando o seu problema. and we will do our best to respond promptly and provide the assistance you need.
Video Guide
Remove the Eddy Sensor
Passo 1. Remove the toolhead housing
Please refer to Toolhead Housing Replacement Guide for the X2D to remove the toolhead housing.

Passo 2. Remove the hotends
Please refer to Hotend and Silicone Sock Replacement guide for the X2D to remove the hotends and hotend silicone socks.
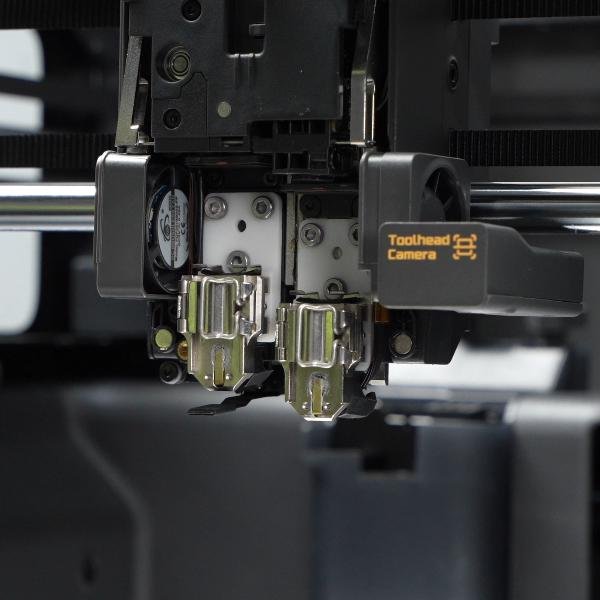
Passo 3. Remove the Left Eddy Sensor
Use an H1.5 allen key to remove the single screw of the left filament cutter lever to separate the lever from the filament cutter assembly.

Use an H2.0 and H1.5 allen keys to remove the two screws fixing the left hotend fan (marked with red 1, 2),
Then use an H1.5 allen key to remove the two screws fixing the left Eddy Sensor bracket (marked with yellow 3, 4),
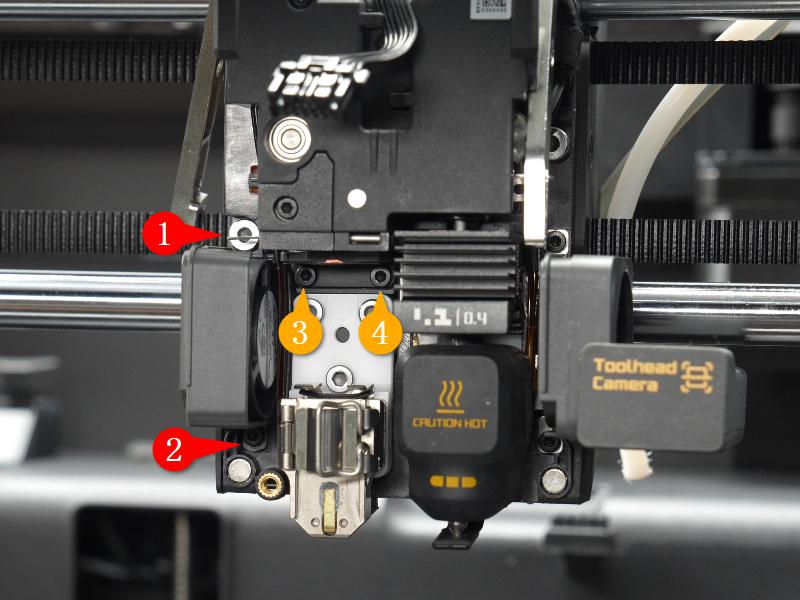
Remove the marked screws |
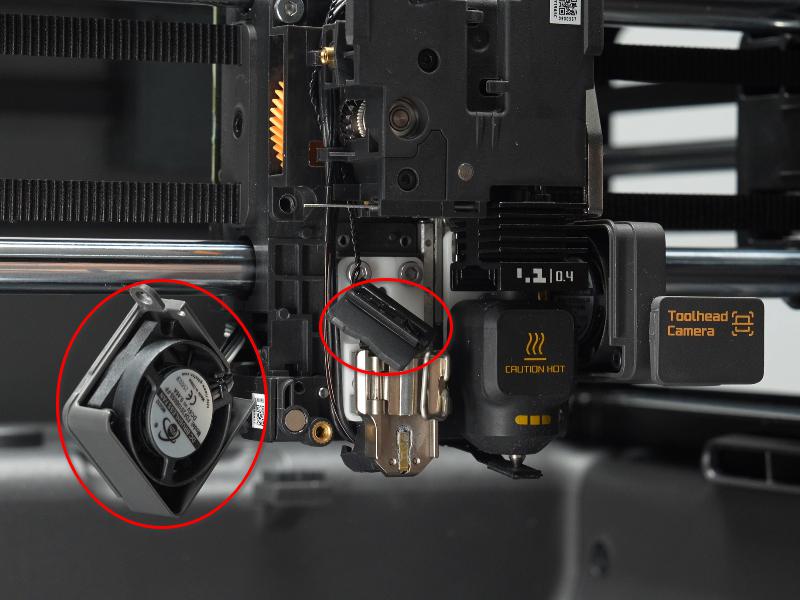
Loosen the hotend fan a eddy coil |
Passo 3.1 Remove the Left Eddy Coil Cable
Peel off the foam on the toolhead interface board and disconnect the left Eddy Sensor connector by pulling perpendicular to the connector direction.
- You can use a small H1.5 allen key to help disconnect the coonnector.

Peel off the foam |

Disconnect the connector |
Detach the Eddy Sensor cable from the bracket (red arrow) and two locking tabs (yellow arrow), and remove the left Eddy Sensor.
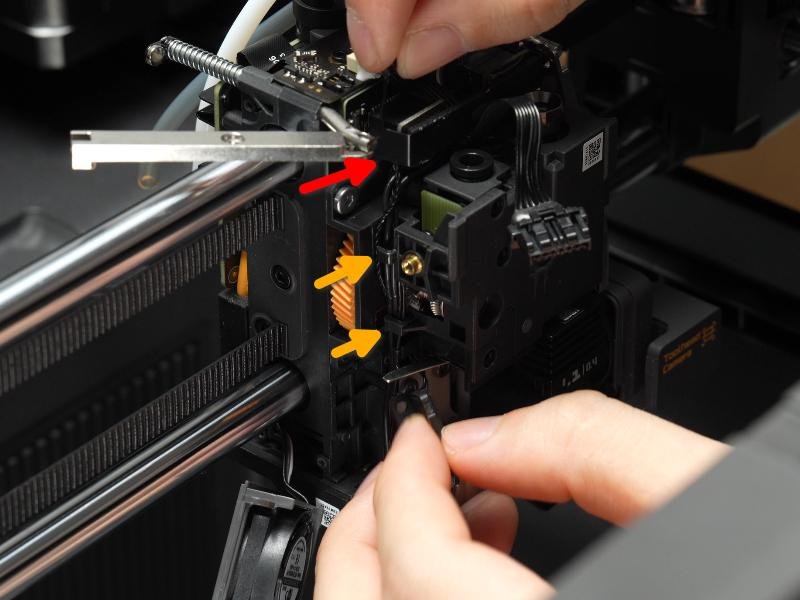
Passo 4. Remove the Right Eddy Sensor
Passo 4.1 Remove the Metal Pressing Bracket
Use an H2.0 allen key to remove the two screws and take off the metal pressing plate bracket.
Use an H1.5 allen key to remove one screw of the right filament cutter lever and separate the lever from the filament cutter assembly.

Passo 4.2 Remove the Right Eddy Coil Cable
Peel off the foam on the toolhead interface board, disconnect the right Eddy Sensor connector and the right filament sensor assembly connector by pulling perpendicular to the connector direction.

Peel off the foam |

Disconnect the connector |
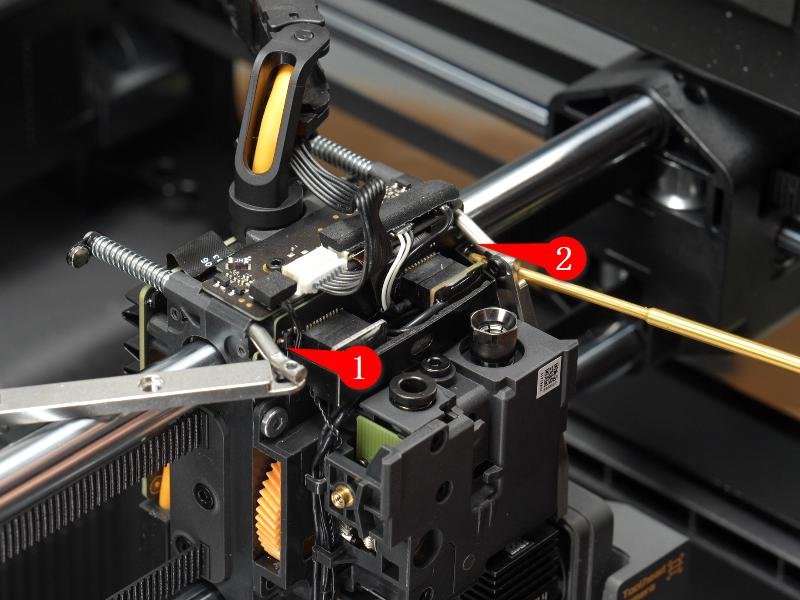
Remove the cable fixing tape and loosen the cable from the metal locking tab.

Loosen the tape and open the metal locking tab |
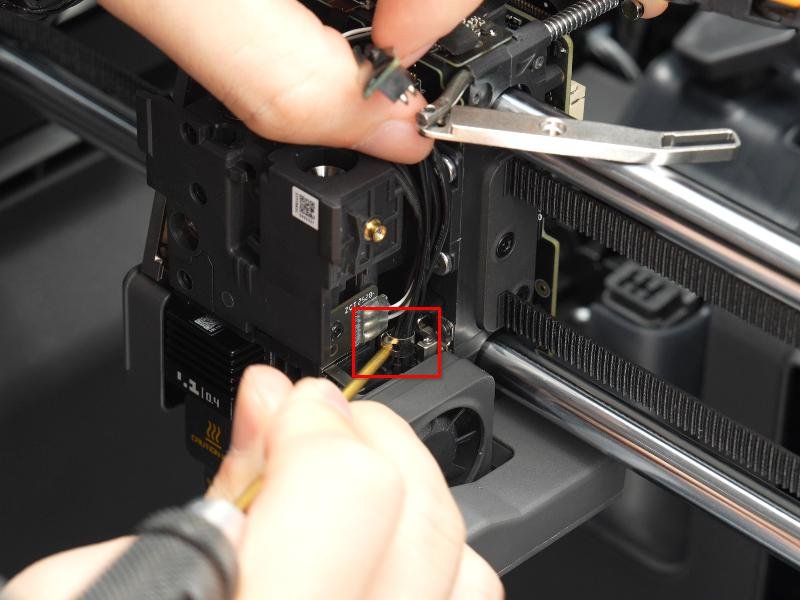
To open the metal locking tab, gently bend it outwards |
Passo 4.3 Remove the Right Eddy Sensor
Use an H1.5 allen key to remove the two fixing screws and gently pull out the right Eddy Sensor.

Install the Eddy Sensor
Passo 1. Install the Right Eddy Sensor
Passo 1.1 Secure the Right Eddy Sensor
Install the right Eddy Sensor above the right hotend heating assembly and secure it by fastening two screws.
Passo 1.2 Connect the Right Eddy Sensor Cable
Connect the right Eddy Sensor cable and the right filament sensor assembly to the toolhead interface board, then reapply the foam.

Passo 1.3 Route the Right Eddy Sensor Cable
Insert the Eddy Sensor cable into the metal locking tab, then rewrap the cable with tape.
Passo 1.4 Install the Metal Pressing Bracket
Install the metal pressing plate bracket and use an H2.0 allen key to fasten the two screws to secure it.
Install the right filament cutter lever and secure it with one screw.
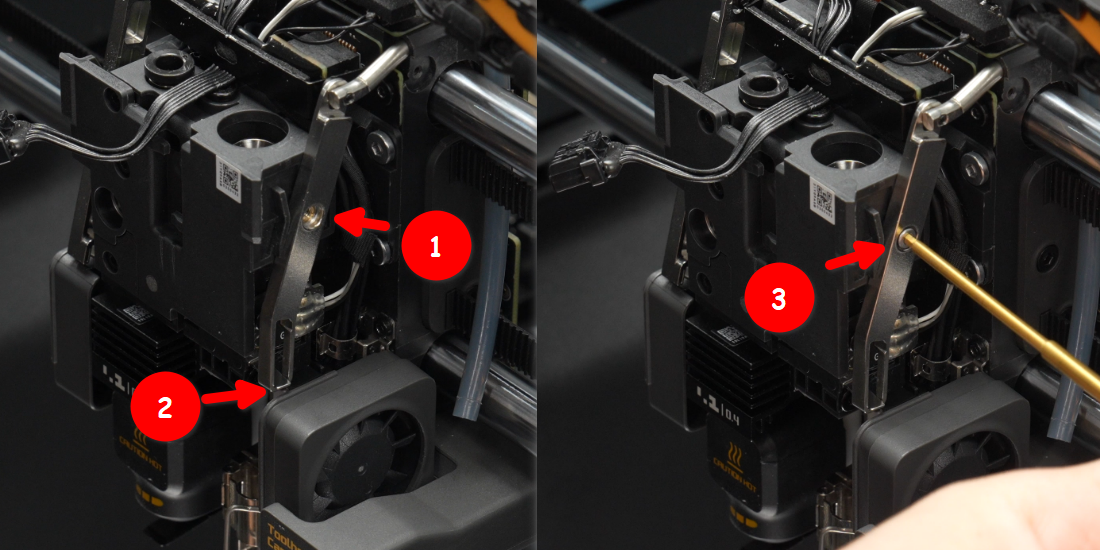
Passo 2. Install the Left Eddy Sensor
Passo 2.1 Secure the Left Eddy Sensor
Install the left Eddy Sensor above the left hotend heating assembly, securing it with two screws; then install the left hotend fan, fixing it with two screws.

Passo 2.2 Connect the Left Eddy Sensor Cable
Route the Eddy Sensor cable beneath the hotend heating assembly interface board bracket, connect it to the interface board, then organize the cable into the two locking tabs,
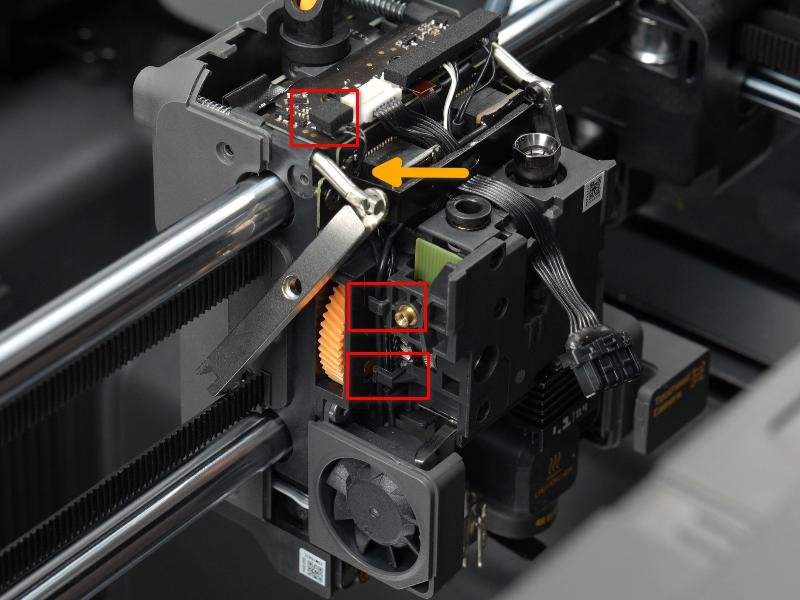
Passo 2.3 Install the Left filament cutter lever
Install the left filament cutter lever, ensuring the cutter assembly’s shaft is locked into the lever’s notch, then secure the lever with one screw.

Passo 3. Install the Hotend
Refer to Hotend and Silicone Sock Replacement guide for the X2D in order to install the hotend and hotend silicone sock.

Passo 4. Install the Toolhead Housing
Please refer to Toolhead Housing Replacement Guide for the X2D to install the toolhead housing.

Verifying Success
✅ After replacing the Eddy Sensor, perform a heatbed calibration. It should complete without any errors.
If any anomalies occur during calibration, please refer to Eddy Sensor Adjustment Guide for the X2D for further tuning.
If you encounter any issues, please retrace your steps and check all connections before trying again. If the problems persist, please contact the Bambu Lab service team for further assistance.
Notas Finais
We hope this guide has provided clear and practical support.
If the issue remains unresolved, please submit a support ticket and include your recent printer logs and additional pictures or other details. Our technical team will review your request and provide detailed assistance.
You can also visit Bambu AI, which can instantly answer common questions and provide you with operational guidance.


