
Front Door Mounting Replacement Guide for the P2S/X2D
Bambu Lab X2D • Série Avançada X2
Front Door Mounting Replacement Guide for the P2S/X2D
Front Door Mounting
The front door mounting kit is the set of connecting parts used to install the glass front door onto the printer. It consists of an upper hinge, a lower hinge, and a silicone strip.

Applicable Models
- P2S
- X2D
When to Use This Guide
- The door hinges are damaged.
Required Tools and Materials
- Front Door hinges (one top and one bottom)
- H1.5 Allen key
- H2.0 Allen key
Removing the Front Door Mounting
Passo 1: Remove the glass front door
Refer to the Replace the P2S Glass Front Door and follow the steps to remove the glass front door.
Warning: Be sure to protect the glass door during disassembly and assembly. Keep a firm grip on it to prevent it from falling and getting damaged.
Passo 2: Remove the front cover
Remove upper cover glass from the top of the printer. Refer to the Replace the P2S Front Cover and follow the steps to remove the screen and front cover.
Passo 3: Remove the Top Hinge
Remove the two screws which mount the top hinge to the printer with a the H1.5 hex wrench.

Passo 4: Remove the Bottom Hinge
Remove the screw which mounts the bottom hinge to the printer with the H2.0 hex wrench.

Install the Front Door Mounting Kit
Passo 1: Mount the Top Hinge
Align the top hinge to its position using the alignment pin, then screw in the two screws with the H1.5 hex wrench.
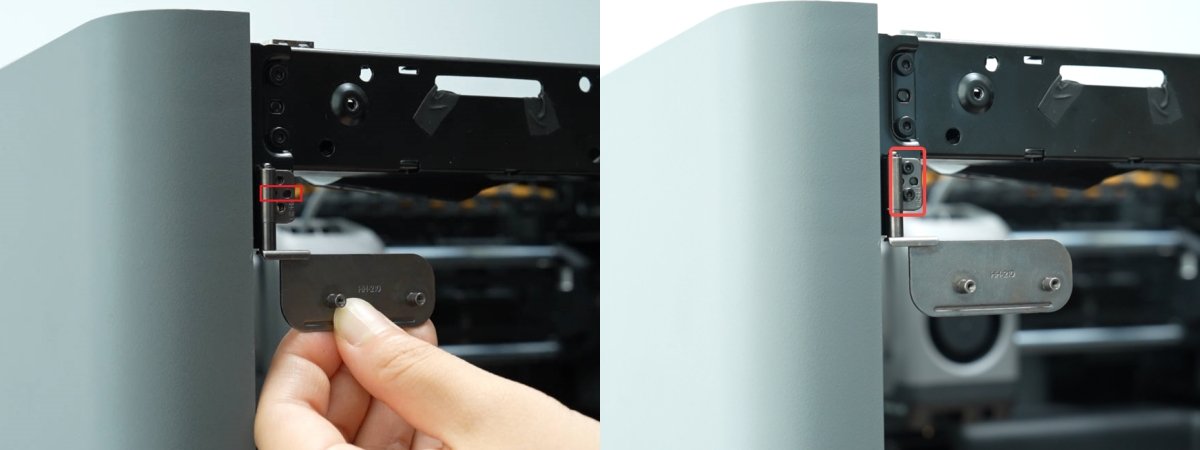
Passo 2: Mount the Bottom Hinge
Place the bottom hinge into its slot and align the screw hole. Screw in the screw with the H2.0 hex wrench.

Passo 3: Install the Glass Front Door
Refer to the Replace the P2S Front Glass Door and follow the steps to reinstall the glass front door.
Passo 4: Install the Front Cover
Refer to the Replace the P2S Front Cover and follow the steps to reinstall front cover and screen. Replace the upper cover glass on top of the printer.
Verifying Success
Ensure that the front glass door is securely mounted and rotates on its hinges between the open and closed positions smoothly.
Notas Finais
We hope this guide has provided clear and practical support.
If the issue remains unresolved, please submit a support ticket and include your recent printer logs and additional pictures or other details. Our technical team will review your request and provide detailed assistance.
You can also visit Bambu AI, which can instantly answer common questions and provide you with operational guidance.


