
Z-axis Belt Tensioner Replacement Guide for the P2S/X2D
Bambu Lab X2D • Série Avançada X2
Z-axis Belt Tensioner Replacement Guide for the P2S/X2D
Z-axis Belt Tensioner
The Z-axis belt tensioner is a mechanism which ensures proper tension on the Z-axis belt, which connects the Z-axis motor to the three lead screws which drive the Z-axis up and down in unison.
When to Use This Guide
- The tensioner is making an abnormal noise not solved with lubrication
- Tensioner idler bearing failure
Required Tools and Materials
- H2.0 hex wrench
- H1.5 hex wrench
- New Z-axis tensioner
Aviso de Segurança
IMPORTANT!
Always power off and disconnect power on the printer before performing maintenance work. Not doing so means there is a risk of electric shock, short circuit, and damage to the printer or surrounding area.
When a maintenance task necessitates the printer being powered on, use insulated gloves for safety and pay special care not to pinch, damage, or put pressure on any exposed wires, connectors, or circuit boards. Additionally, the nozzle can be extremely hot so never touch it with exposed skin.
If you have any questions or concerns related to the above or the steps in this guide, please open a new ticket in our Support Page for assistance.
Explanation of Changes to the X2D Z Tensioner:
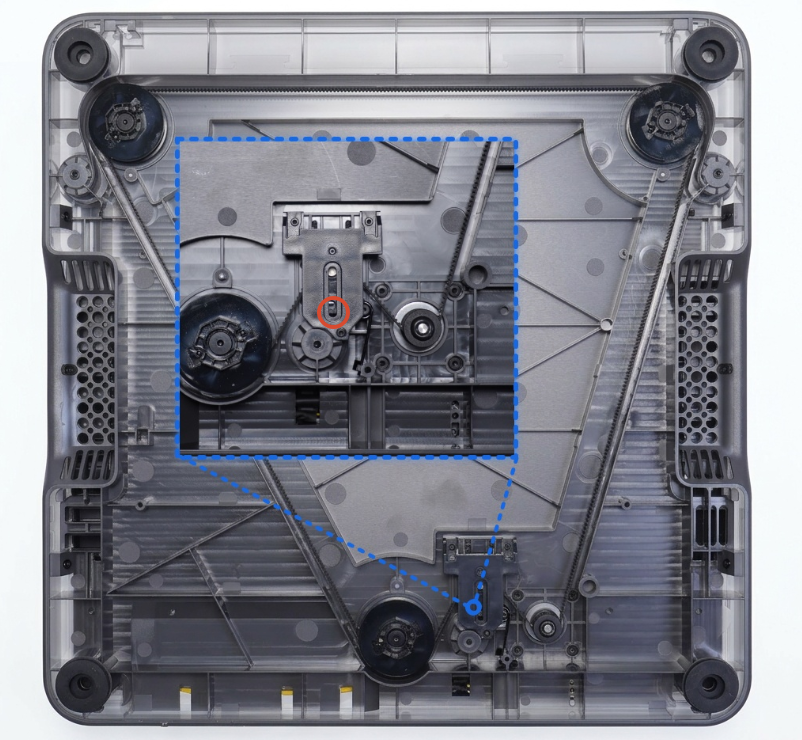
Due to the addition of the active chamber temperature function in the X2D, the printer’s base may experience slight physical deformation under high-temperature environments. To ensure the Z-axis can home normally and avoid abnormal motion resistance at different temperatures, the X2D has eliminated the locking screws on the tensioner (marked in red in the figure), allowing it to dynamically adapt the belt tension based on the ambient temperature. Therefore, the Z-axis belt on the X2D does not require additional tensioning adjustments during daily use.
Removing the Z-Belt Tensioner
Passo 1: Lower the Heatbed
Using the printer’s screen, lower the heatbed all the way down to the bottom of the enclosure.

Then, use the H2.0 hex wrench to install the 3 screws which hold the heat bed down (the same ones which were removed during unboxing). Turn off the printer and disconnect its power.

Locking the heatbed is a critical preparatory step. It effectively fixes the relative positions of the three Z-axis lead screws, preventing them from rotating or shifting unexpectedly under external force or the weight of the bed when the belt is loosened. This maintains the reference plane of the heatbed, avoids tilt beyond the allowable range, and preserves the initial levelness of the print platform.
Passo 2: Place the Printer on Its Side
Before laying the machine on its side, complete the following steps to prevent the glass panels from being damaged:
- Remove the top glass cover to prevent it from sliding out when the machine is tilted.
- Tape the glass front door closed to prevent it from opening accidentally when the machine is tilted.

It should not be necessary to place the printer upside down, but please note that doing so without removing the screen will damage the screen. Please refer to Replace the Screen.
Passo 3: Remove the Screws
Release the spring. After release, the spring moves from mark 1 to mark 2 in the figure.

Use an H1.5 allen key to remove the 3 tensioner cover fixing screws (marked in red), and use an H2.0 allen key to remove the 1 tensioner screw (marked in green). Then remove the tensioner cover.

✅ Note: The X2D removes the tensioner locking screw (marked in green), so this step only requires removing the 3 screws (marked in red).
Remove the Z tensioner cover.

Remove the torsional Z-belt tensioning spring.

Passo 4: Remove the Z-Belt Tensioner
Remove the Z-belt from around the Z-belt tensioner.

Move the tensioner to the end of the rail to remove the tensioner itself.

Be careful not to lose the nut which resides within the tensioner.

Installing the Z-Belt Tensioner
Passo 1: Install the Z-Belt Tensioner
Confirm that the nut is still in its slot within the tensioner and slot the tensioner through the openings.

Slide the tensioner toward the back of the printer so it is retained.

Passo 2: Install the Torsion Spring
Install the torsion spring on its mount. The longer side of the spring should be to the left, as shown in the image below.

Re-route the Z-belt through the gears and tensioner as shown below.
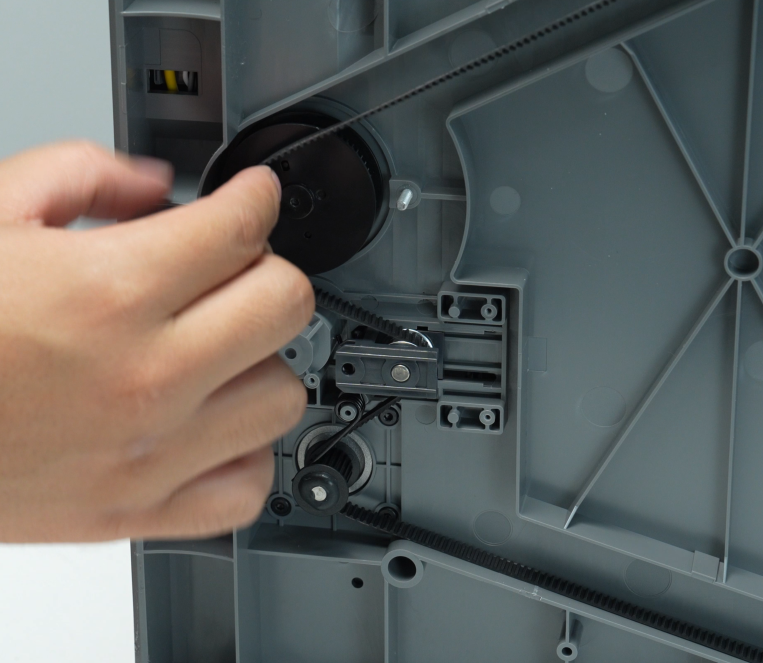

Install the tensioner cover, using the H1.5 hex wrench to tighten its three screws. Install the larger tensioning screw using the H2.0 hex wrench, but do not tighten it (wait until Passo 6 below).
✅ Note: The X2D removes the tensioner locking screw (marked in green), so this step only requires driving in the 3 screws (marked in red).
Move the long end of the tensioning spring back in place on its mount.

Passo 3: Remove the Z Slider Lock
Place the printer upright.
Use the H2.0 hex wrench to remove the three screws securing the heat bed in place
Passo 4: Tension the Z-Axis Belt
Lay the printer on its side again and pull the Z-axis belt back and forth to confirm smooth movement. Then tighten the tensioner screw.

Verifying Success
Connect the printer’s power and turn it on and run printer calibration. If no errors are reported, the replacement was done successfully.
Notas Finais
We hope this guide has provided clear and practical support.
If the issue remains unresolved, please submit a support ticket and include your recent printer logs and additional pictures or other details. Our technical team will review your request and provide detailed assistance.
You can also visit Bambu AI, which can instantly answer common questions and provide you with operational guidance.


