
How to Upload the Log Files
Bambu Lab H2S • Série Comercial H2
How to Upload the Log Files
Submitting Support Tickets and Logs via Bambu Handy
Submitting a Support Ticket
Open the Bambu Handy app, tap “Me” in the bottom navigation bar, then select “Support Center” to enter the Support Center interface.
On the Support Center page, locate the “Ticket Service” section and tap “Add a ticket“. Select the type of issue you are experiencing. Here, using Printer as an example, tap the “Next” button to proceed to the ticket submission page.

Select the corresponding Region, Serial Number, and Printer model for your printer. If the corresponding printer is bound in Bambu Handy, you can select it by tapping the arrow on the right, and the system will automatically fill in the SN. Once completed, tap the “Next” button.

Add a detailed description in the problem description to help us understand the issue more accurately. Select the problem type; you can tap the “Auto-detect” button on the right, and the system will automatically identify and fill in the problem type. You can also upload relevant pictures and videos. After uploading, tap “Next“.

Follow the prompts to upload attachments such as Printer logs, HMS phot, filament type, etc. Tap “Submit” to complete the ticket upload.

Log Upload
After tapping “Add Logs“, select the corresponding printer for which you need to upload logs to enter the log upload page. There are two methods for log upload:
- Associate printing history: Select the print record corresponding to when the problem occurred.
- Fill in manually: Manually set the time period for exporting logs.
Tap “Confirm” to complete the log upload.

Submitting Support Tickets and Logs via the Bambu Lab Official Website
Submitting a Support Ticket
Click the “New Ticket” button on the right side of the service ticket page, select the type of issue you are experiencing. Here, using Hardware as an example, click to proceed to the ticket submission page.

Select the corresponding Region, Product SN, and Printer model for your printer. Add a detailed description in the problem description to help us understand the issue more accurately. Select the problem type, and you can also upload relevant pictures, videos, and the time the fault occurred.

Follow the prompts to upload attachments such as printer log files, HMS photo, filament type, etc. Click “Submit” to complete the ticket upload.
Note: When uploading, you can select all log files, and the system will automatically package them into a single file.

Log Export
You can also export logs from the printer to external storage first, then use a computer to upload the logs via the website. This section applies to:
H2 Series
P2S
X2D
X1 Series
P1 Series
A Series
R1
H3C
Click the name of the required model to jump to the corresponding guide:
H2 series, P2S and X2D Printers
- On the printer screen, go to Settings > Export Log to external storage.

- Tap Export. If the type of failure encountered is related to AI or vision, be sure to check Export key photos from camera.

- Once export completes, remove the USB drive from the printer and insert it into your computer. You will find a .tar or .tar.gz file, which is the log just exported.

NOTE: Do not change the file name.
X1 Series Printers
-
Insert a micro SD card (format: FAT32) into the slot located on the right side of the screen.
-
On the printer screen, go to Settings > Export Log to external storage.

- Tap Export. If the failure is related to Micro Lidar or AI, please check Export key photos from camera.

- Remove the SD card after export and insert it into your computer. You will find a .tar or .tar.gz file, which is the log just exported.
NOTE: Do not change the file name.
P1 Series Printers
- On the printer screen, go to Settings > SD Card > Eject.

- Insert the SD card into the computer. The logs are located in three folders:
-
Logger folder: The essential log contains information about temperature, motion system, wifi/camera/communication with cloud/printer status, etc.
-
Recorder folder: Logs identify issues like print quality and abnormal stops in printing.
-
Corelogger folder: Logs for AP board recovery (may not exist).

A Series Printers
- On the printer screen, go to Setting > SD Card > Eject.
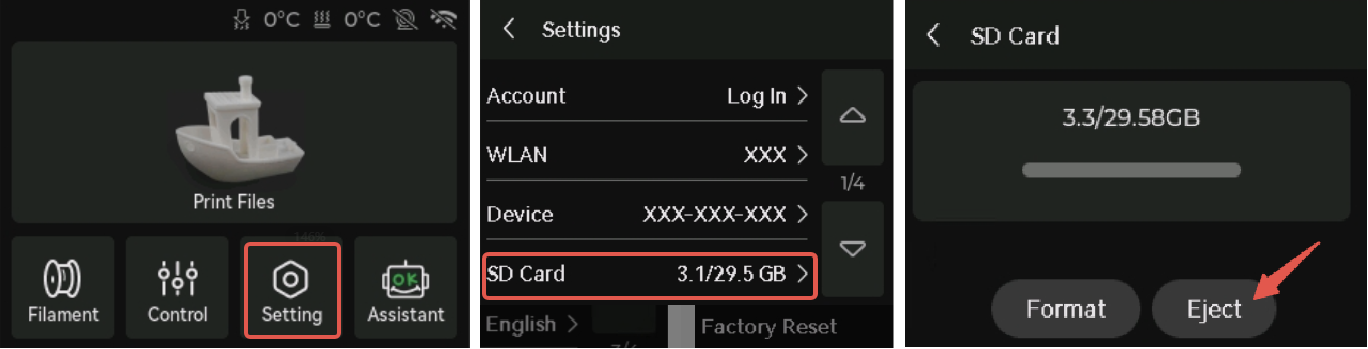
- Insert the SD card into the computer. The logs are located in three folders:
-
Logger folder: The essential log contains information about temperature, motion system, wifi/camera/communication with cloud/printer status, etc.
-
Recorder folder: Logs identify issues like print quality and abnormal stops in printing.
-
Corelogger folder: Logs for AP board recovery (may not exist).
R1
Logs can be exported from Bambu Suite via USB-C or a LAN connection.
- Connect the R1 via USB-C or LAN.
- The USB-C port is located on the side of the R1. Use a USB-C cable to connect the R1 to your computer.

- Tap Settings – LAN Only – On to enable LAN Only mode.
 |
 |
 |
- Log in to your account, select New Project or open an existing project, then open the Device page in Bambu Suite.
 |
 |
-
On the Settings page, confirm that R1 is selected. Find the Log Export section and click Export Now.

-
Select all options, click Browse to choose a folder for the exported logs, then click Confirm. Wait until a message indicates that the log download is complete.

H3C Printer
- On the printer screen, go to Settings > Export Log to external storage.


- Tap Export. If the type of failure encountered is related to AI or vision, be sure to check Export key photos from camera.
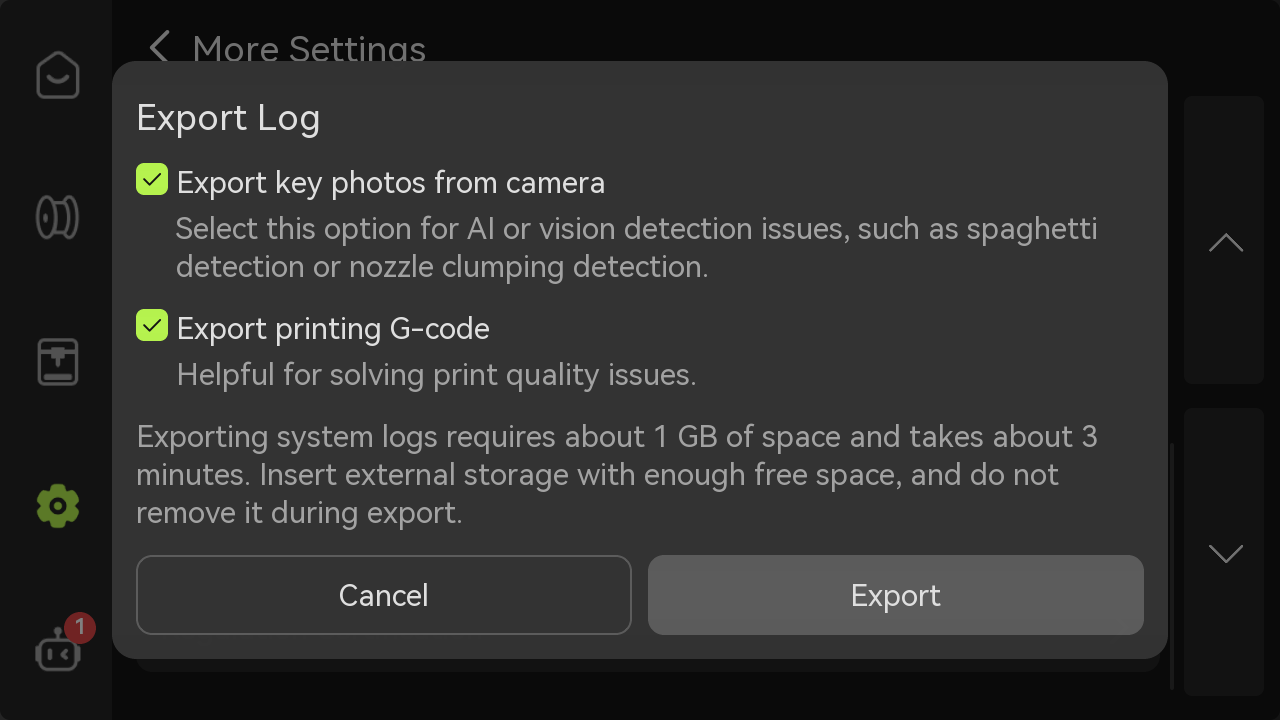
- Once export completes, remove the USB drive from the printer and insert it into your computer. You will find a .tar or .tar.gz file, which is the log just exported.

NOTE: Do not change the file name.
FAQ
What are log files? Why are they required when submitting a technical support ticket?
Printer logs record abnormal information during the printer operation process. Analyzing these logs helps the support team quickly identify problems and provide solutions. Including log files when submitting a chamado técnico improves problem-solving efficiency, saves time, and reduces the need for repeated communication.
What kind of video needs to be uploaded? What if the printer does not have time-lapse recording turned on?
If you encounter a printer issue, you can use your phone to record a video describing the problem. Depending on the type of issue, we offer the following suggestions:
- Visible structural damage to printer/AMS components: Record a video showing the damaged area.
- Power supply/electronic malfunction: Record a video of the cable connections and refer to the indicator LED explanations.
- Toolhead module malfunction: Record two videos – one video to record the cable connection status, and another video to record the indicator on the screen or in the Bambu Software that shows the filament being fed into and out of the extruder when loading and unloading the filament from the top of the extruder. Please refer to Passo 13 in Replace the TH Board Set V9 (Single or Dual Red Laser) – X1 Series
- Heatbed module malfunction: Record a video of heatbed homing and bed leveling.
- Micro Lidar/AI/Screen/microSD Card/Camera/LED/Fan/Chamber Temp Malfunction: Record a video showing the malfunctioning module and its surrounding cable connections.
- X/Y/Z axis noise/malfunction: Record a video of the XYZ movement.
- AMS malfunction: Record a video of the entire filament loading and unloading process, including the filament path and any error messages on the screen. For how the AMS works, please refer to AMS main functions and workflow introduction.
- Printer firmware/network malfunction: Record a video of the steps to connect the printer to the network.
- Bambu software (Bambu Studio/Handy) malfunction: Record a video detailing the software issue.
- Print quality not meeting expectations: Record a video describing quality problems.
If you encounter an intermittent issue, we recommend checking if there is any time-lapse recording on the microSD card. This can assist in diagnosing the problem.
My issue is not listed in the options. How can I submit a chamado técnico?
If your issue is not listed in the options, you can select Other option to submit your issue.
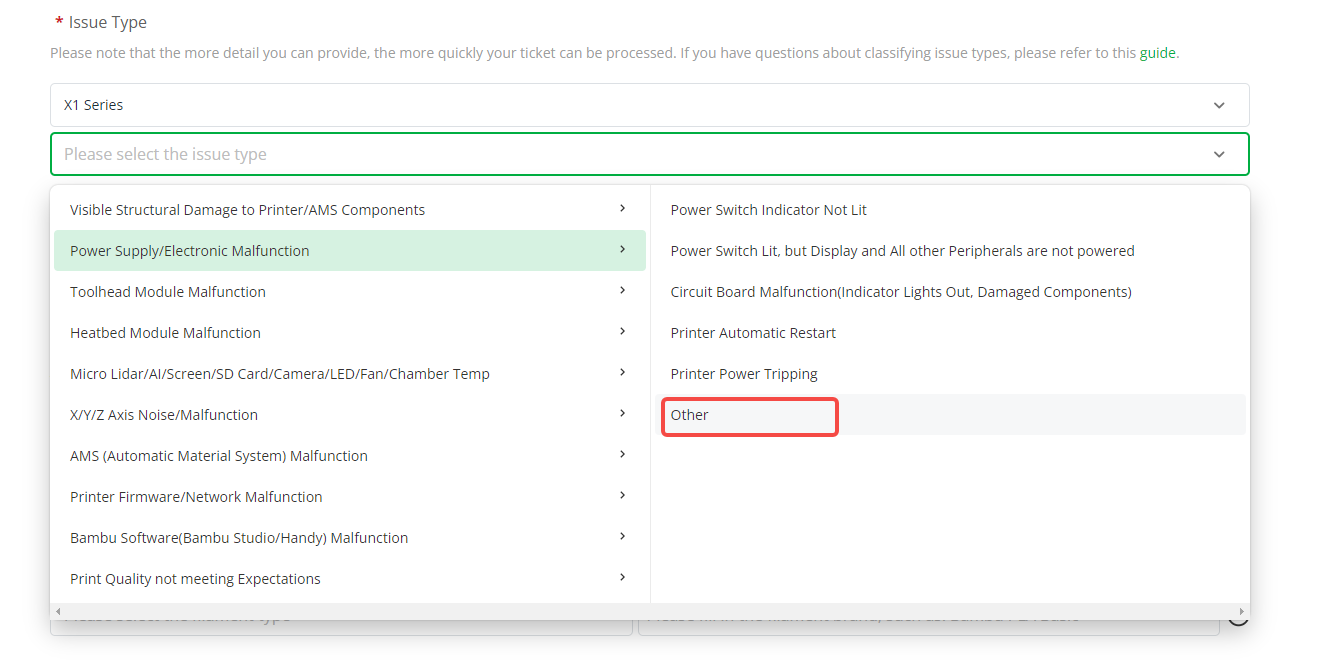
In this case, we will not force you to upload pictures, videos or printer logs, but this may affect our diagnosis of the problem. We recommend that you try to select the most accurate issue when creating a support ticket.
If follow-up technical support personnel recommend that you record a video or upload a log, please provide it as requested. The information is important for us to diagnose and resolve problems.
We understand that providing this information may sometimes be inconvenient, but we believe that with your cooperation, we can resolve your issue more efficiently. If you encounter any difficulties while providing the requested information, please let us know, and we will do our best to assist you.
Notas Finais
Esperamos que o guia detalhado fornecido tenha sido útil e informativo.
If this guide does not solve your problem, please submit a support ticket. We will answer your questions and provide assistance.
If you have any suggestions or feedback on this Wiki, please leave a message in the comment area. Thank you for your support and attention!


